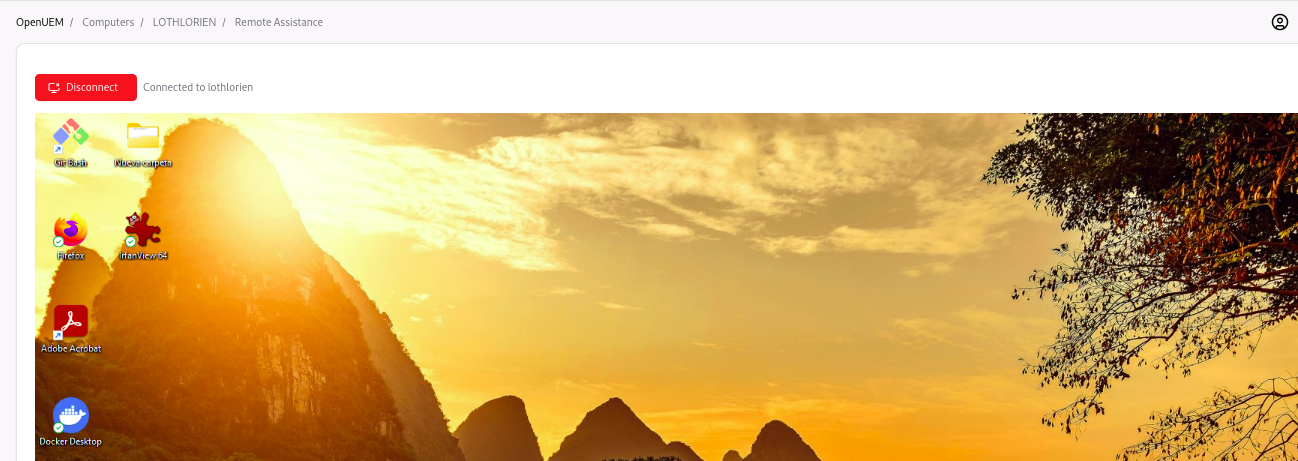
💻 Computers
The computer’s view shows you the inventory of computers for your organization reported by the agents that have contacted OpenUEM and have been enabled.
OpenUEM agents have been designed to offer you concise information so you can focus on the relevant information about your IT assets.
1. Computers' list
The table shows you all the computers with information about its name, the OS version, the manufacturer and model and associated tags.
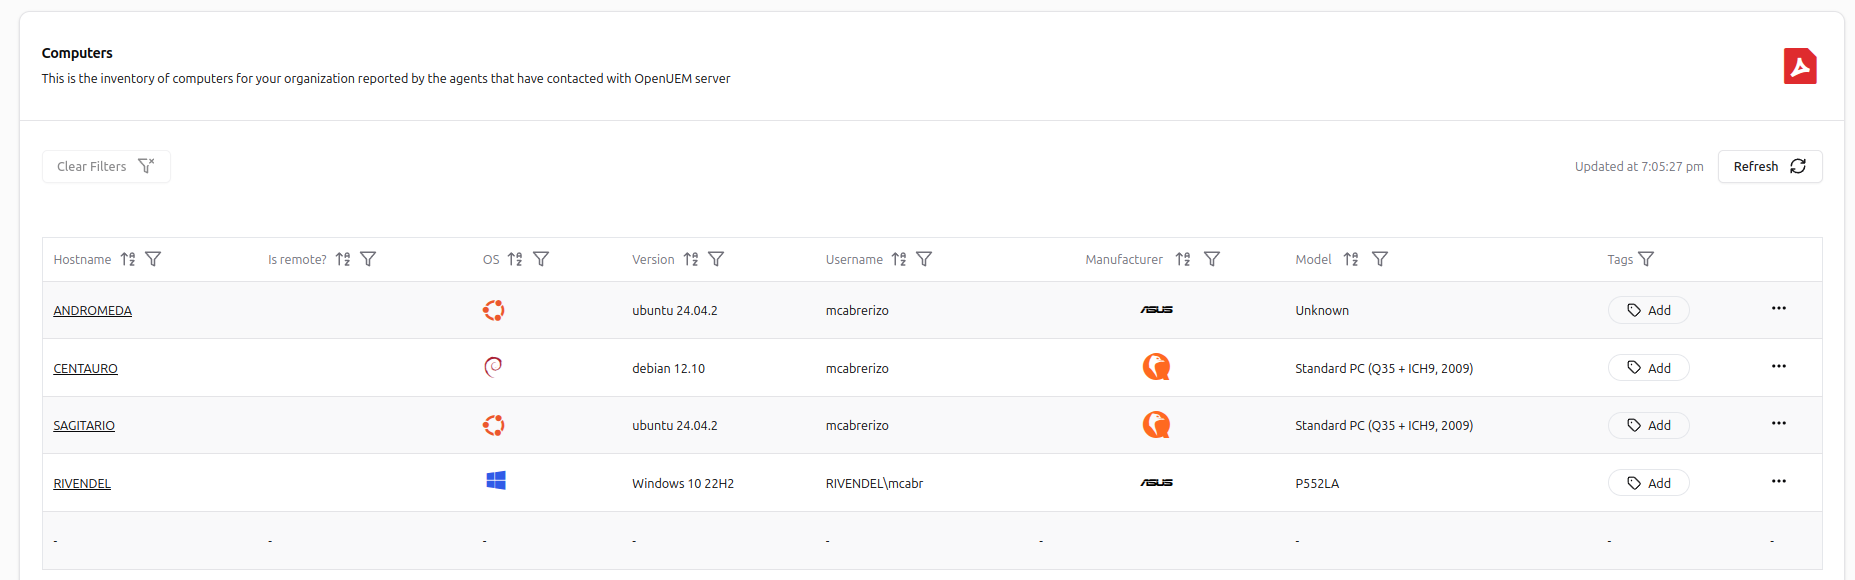
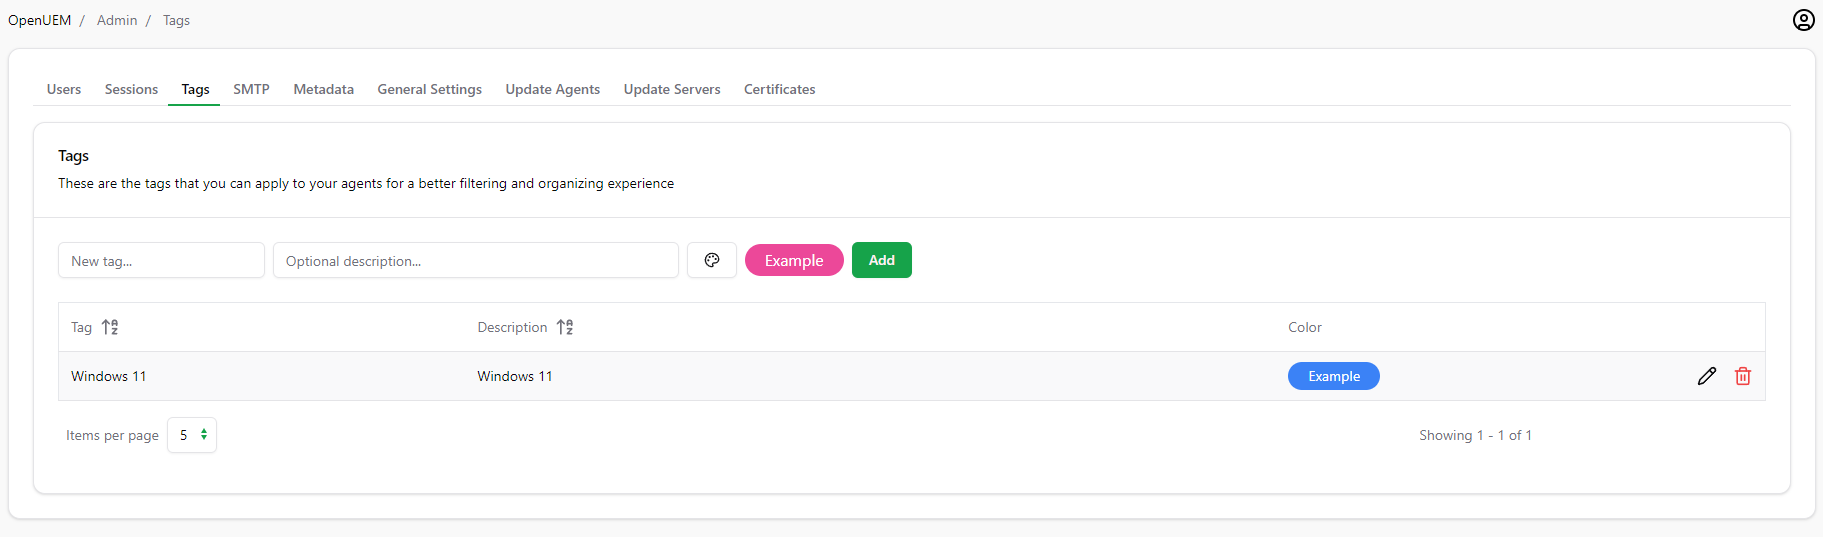
You can create tags by visiting the Admin -> Tags section
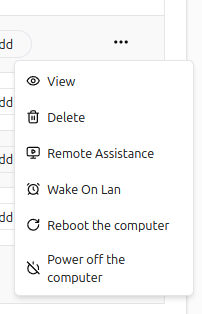
By clicking on the three dots button, you can show a menu with possible actions
If you click on the hostname or use the view action, you’ll visit the computer’s details.
OpenUEM uses DNS and the reported active IP address to identify endpoints that are not located in our LAN, assuming that the associated endpoints are used by remote workers.
OpenUEM uses a plane icon to indicate that the agent is in a remote location. This is important because remote file browsing, remote assistance and WOL (Wake On Lan) are currently not possible as those endpoints are not reachable from the LAN.
2. Computer's details
The information reported by an agent is distributed in several tabs so it’s easier for you to browse the information. Let’s see what is shown and what you can do.
2.1 Overview
A new overview tab is available to summarize important information about your endpoint like the security status and an operating system briefing.
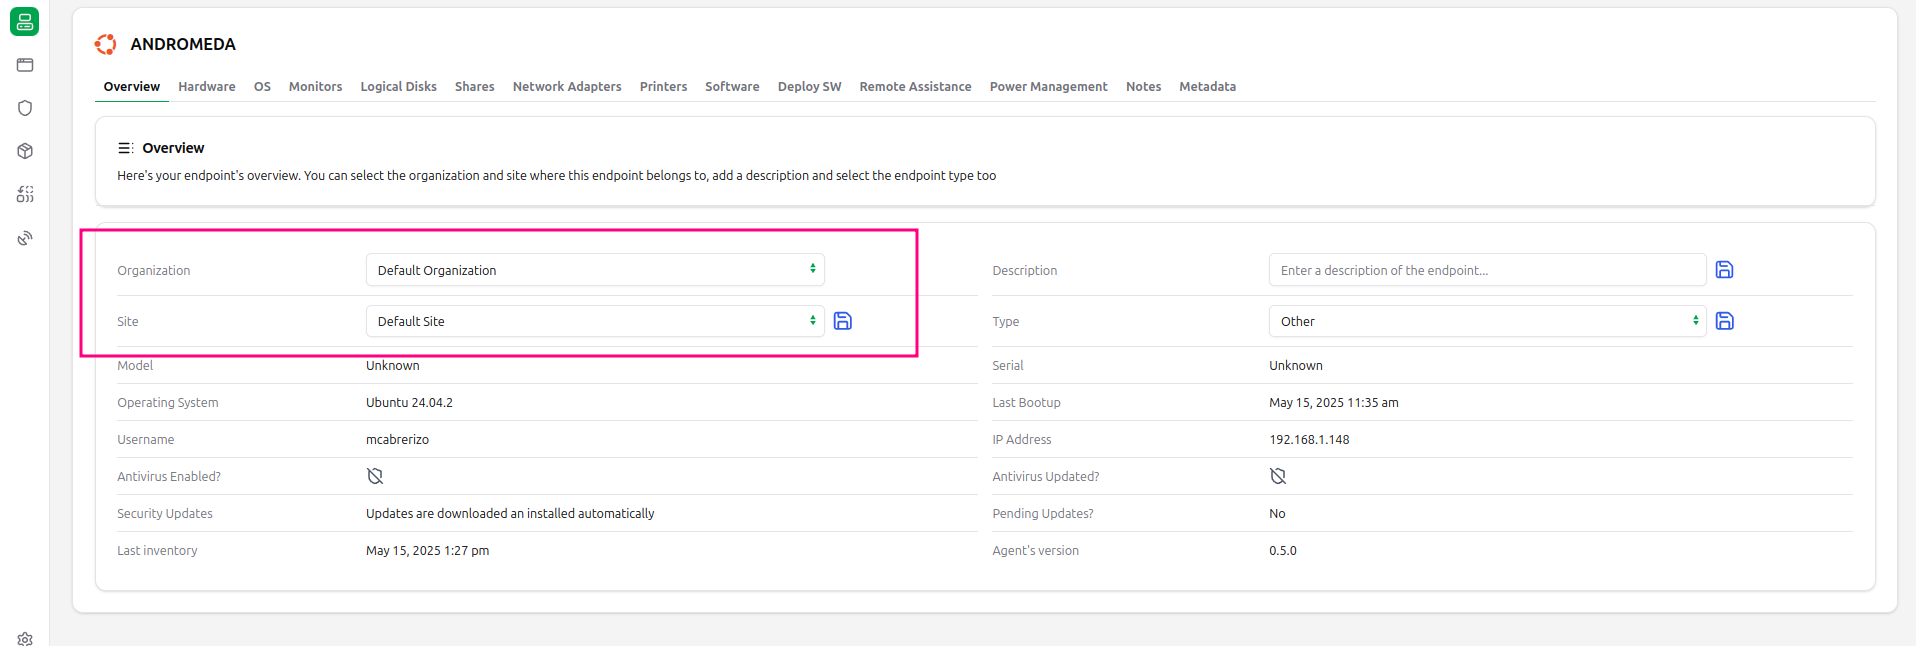
You can give also a description for the endpoint and the type of endpoint (desktop, laptop, tablet...)
From this view we can specify on which organization and site we want to have this endpoint
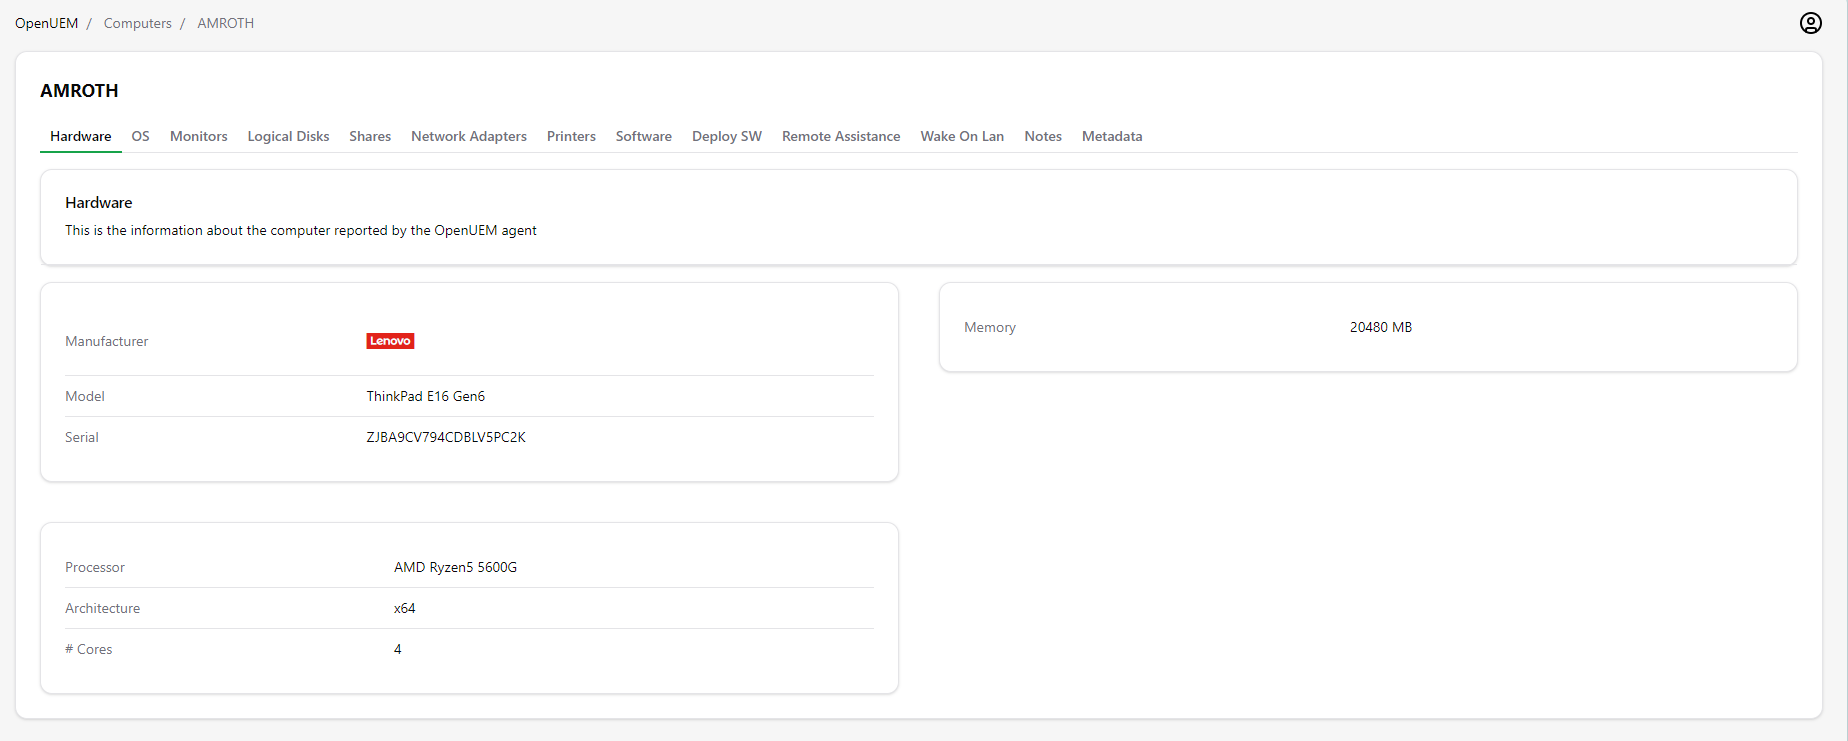
2.2 Hardware
As the name suggests, you’ll have some hardware information about the manufacturer, model, serial number, processor and memory.
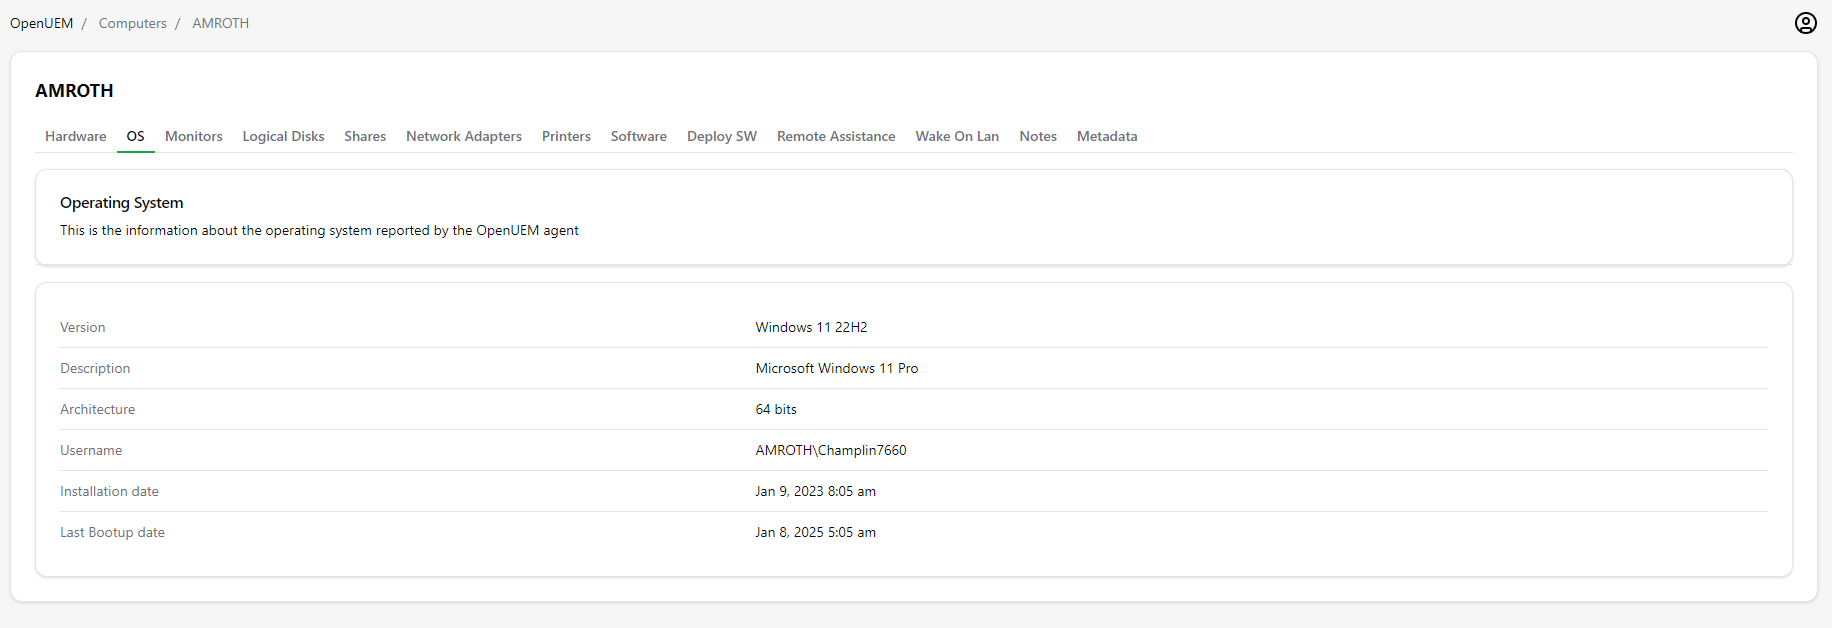
2.3 Operating System
Here, you’ll find information about the operating system like version, description, architecture, the username that is logged in, installation date and the last time the system was booted up.
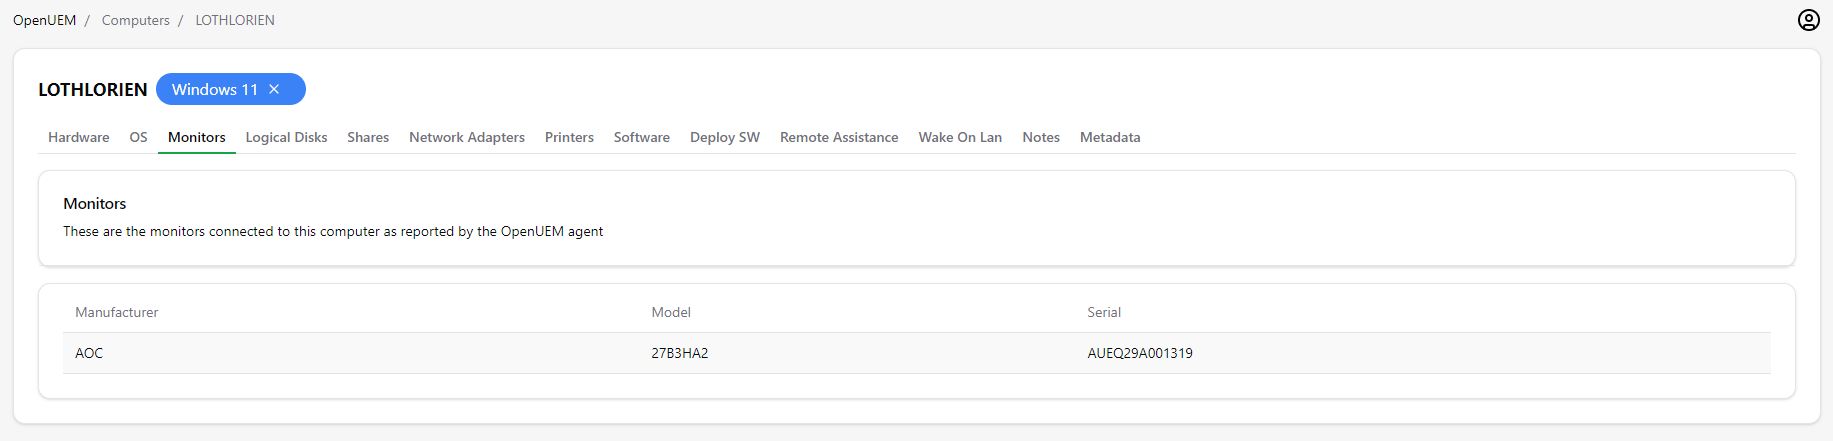
2.4 Monitors
The monitors tab displays which monitors have been connected to the computer including the manufacturer, model and serial number.
2.5 Logical disks
This tab displays the logical disks that are available on the computer. You can check the label applied, the volume name, the file system type, the disk usage, the total size and the remaining space.
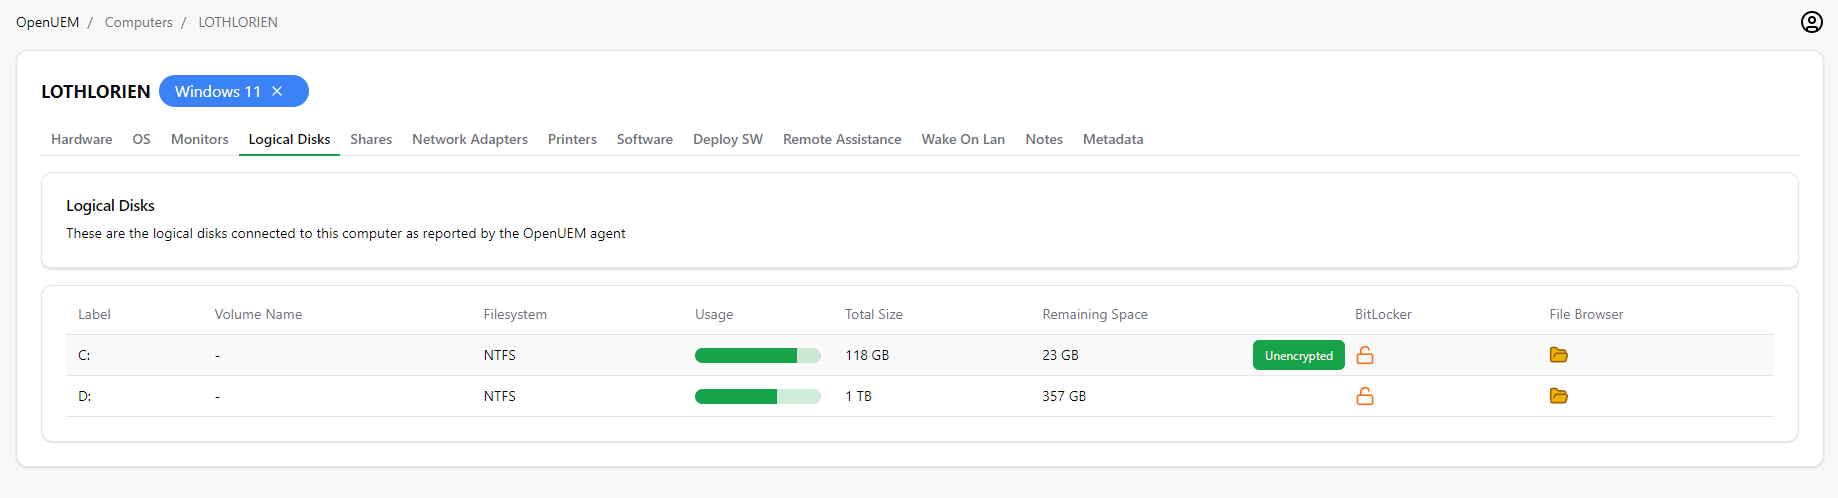
Also, you can know the BitLocker status hovering the mouse over the icon.
BitLocker status is retrieved using WMI and sometimes the query is flaky and can crash showing you an unknown status icon. If you need to know that information quick, you can visit the agents’ view and select the Force restart action menu.
Now, if you click on the icon in the File Browser icon, you’ll open a new window that allows you to browse the logical disk using an SFTP connection.
The connection between the console is secured thanks to two digital certificates. An SFTP certificate which its associated key it's stored in the console that is used to authenticate the connection, and a server certificate that it's stored in the agent an it's generated when the agent is admitted. See Agents' life cycle to know more.
The new window has two sections, a top action menu and a file list below.
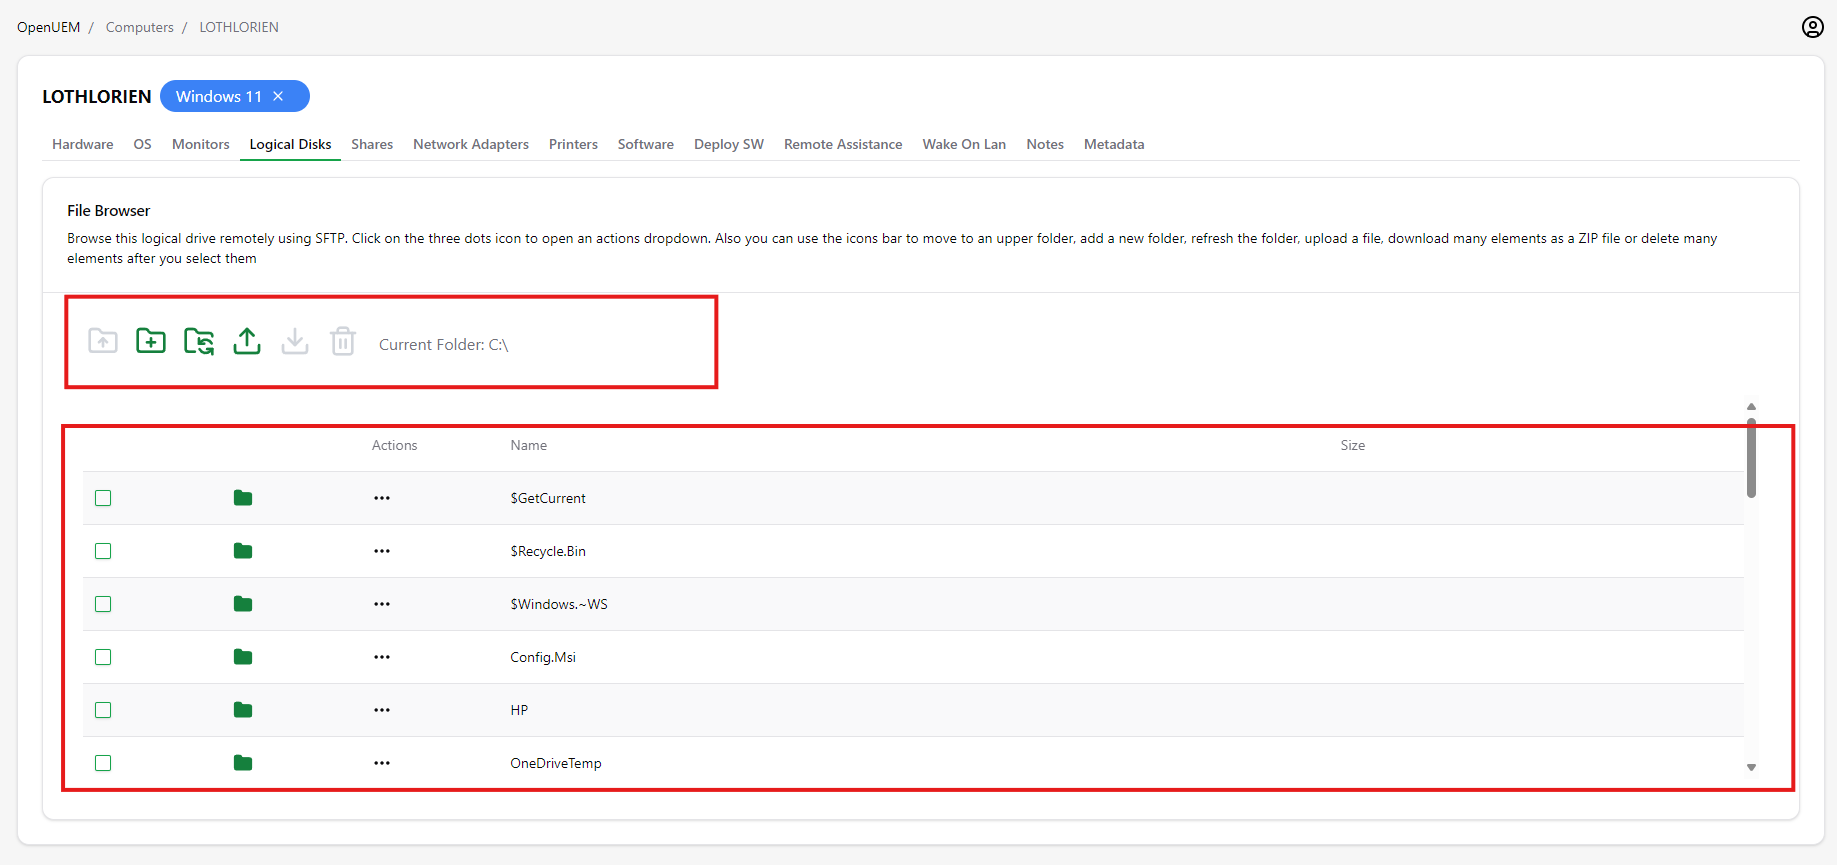
The top menu has these icons:

- Go up one folder in the files’ tree
- Create a new folder in the current folder
- Refresh the files’ view for the current folder
- Upload one file to the current folder
- Download the selected files or folders. If only one file is selected, a file will be downloaded. If a folder is selected or several files are selected, a ZIP file will be downloaded.
- Delete the file or the folder
- Show the current folder’s path
If you want to create a new folder, you must give a name and confirm the action
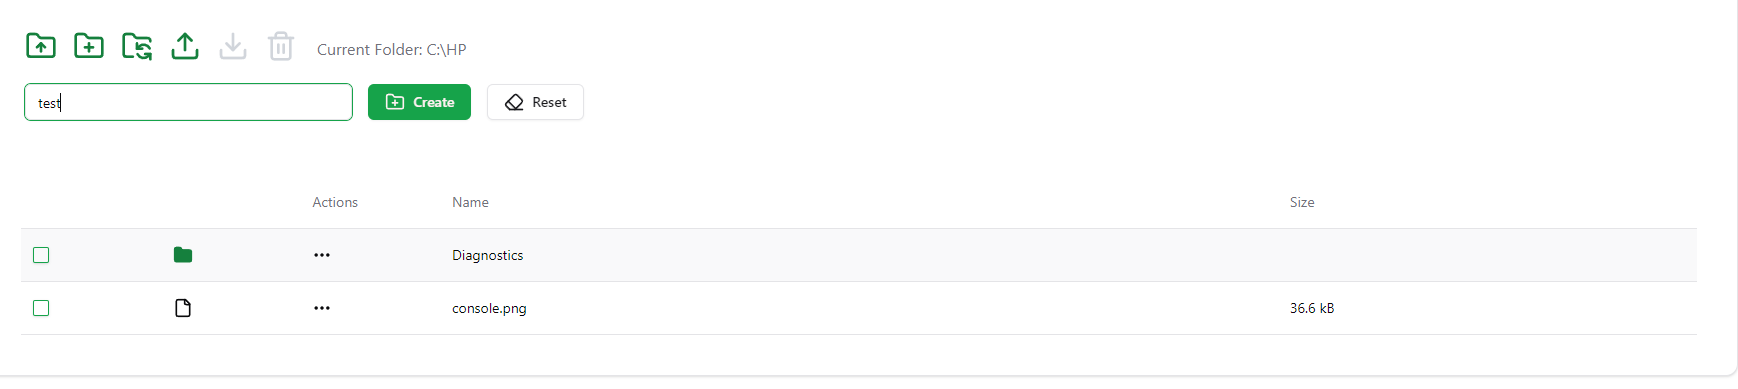
If you want to upload a file, you must give use your web browser's file explorer and click the upload button

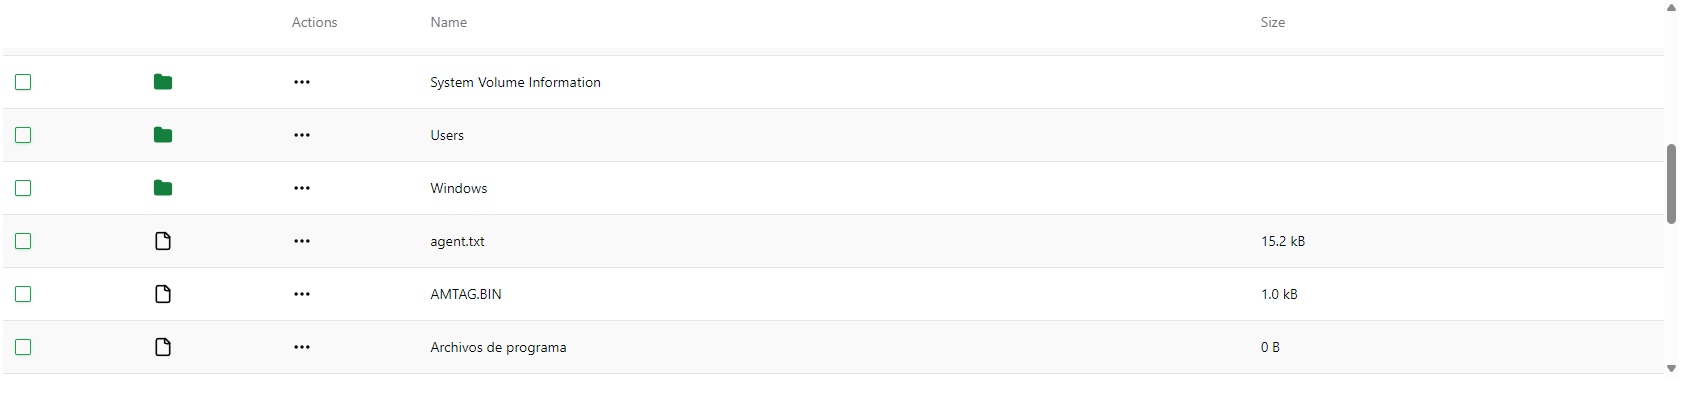
In the file browser’s section, you can scroll the different files and folders that are in the current folder. If you click on the folder icon you can enter that folder.
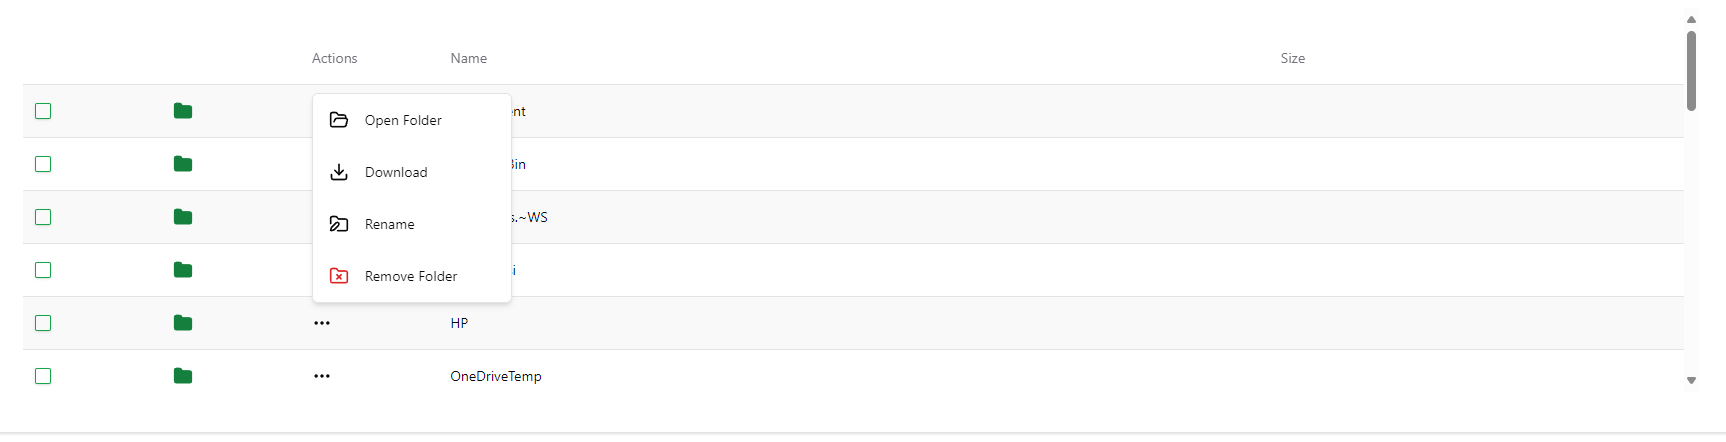
Also, next to each file or folder you can find the three dots button with a menu that gives you several actions to perform on that element:
- Open the folder
- Download the file or folder
- Rename the file or folder
- Remove the file or folder
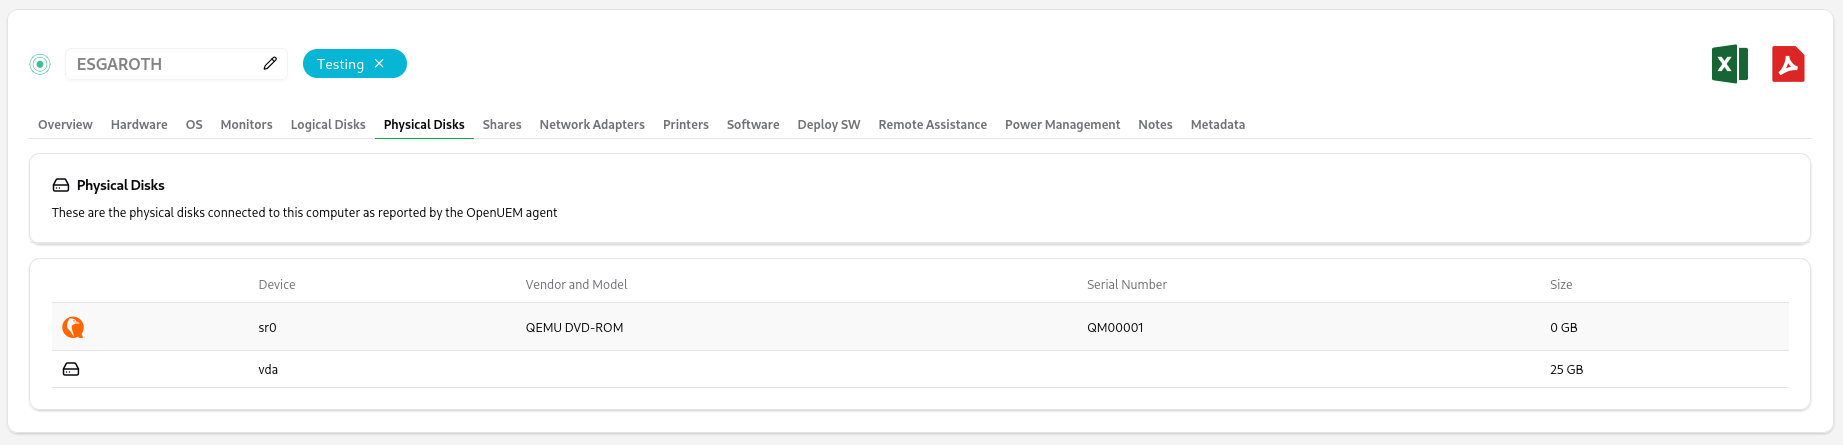
2.6 Physical disks
This tab displays the physical disks that are available on the computer. You can check the device name, the vendor and model of the disk, the serial number and the size of the disk.
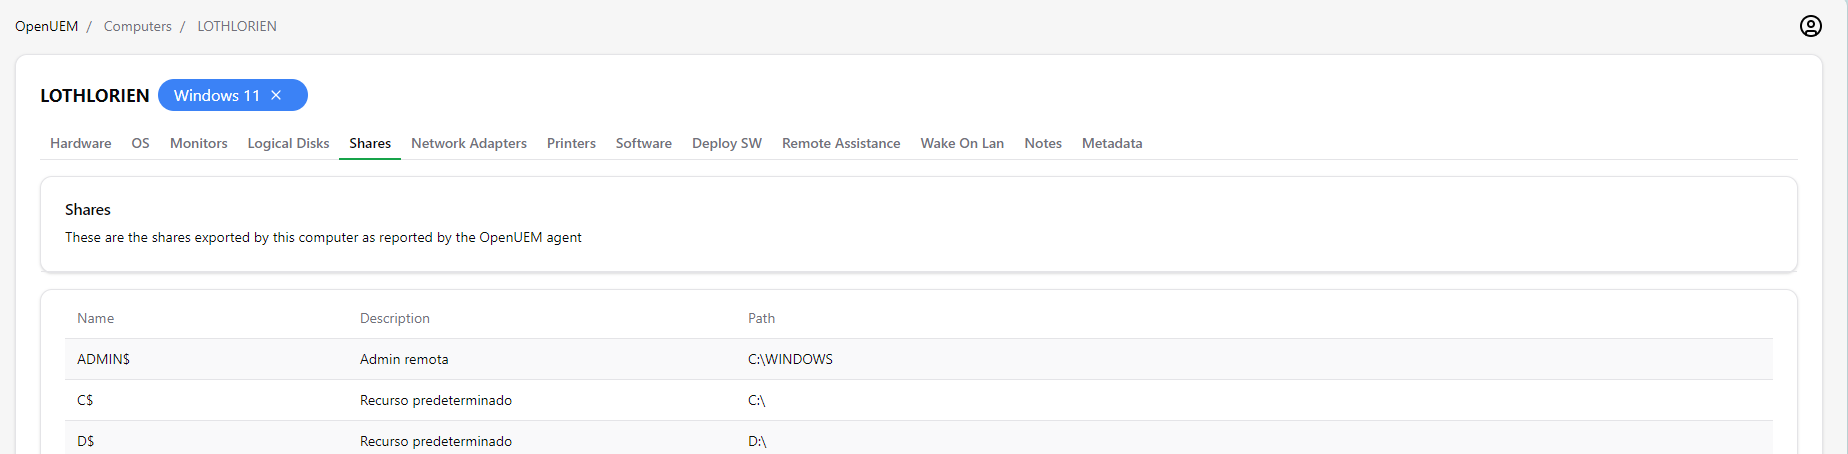
2.7 Shares
This tab shows the resources being shared and exported by this computer
2.8 Network adapters
You can inspect the network adapters connected to a computer by visiting this tab. The agent reports the name of the adapter, its MAC address, the IP address, the subnet, the default gateway, if DHCP is enabled and the speed of the adapter.
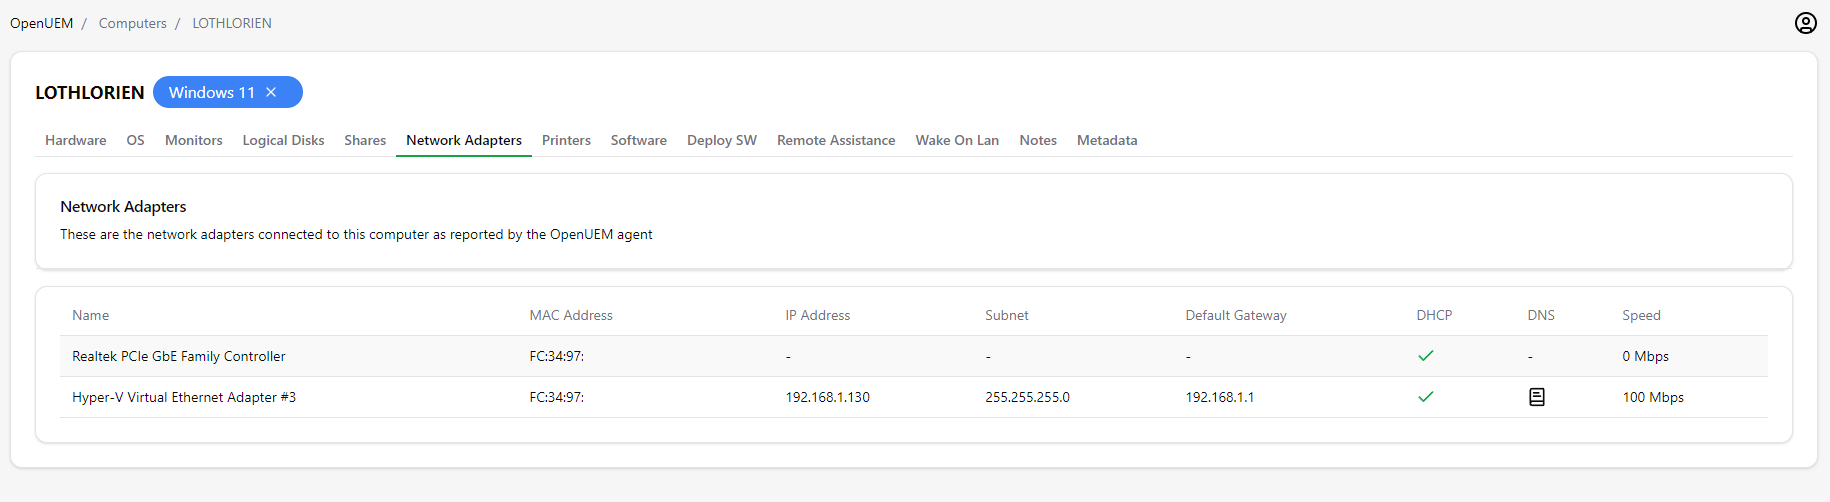
Also, if you move the mouse over the DNS icon you’ll get information about the DNS servers.
2.9 Printers
The list of printers connected to this computer is displayed in this tab. You get the printer’s name, the port’s name, if the printer is the default printer and if the printer is a network printer.

From version 0.7.0 onwards, and if agents are at least 0.6.0, you can set a printer as default or remove it from the endpoint
2.10 Software
OpenUEM agents:
- inspect the Windows registry to look for installed applications either they are installed on a computer level or by user
- use your Linux package manager (apt,zypper,dnf,pacman...) to check which desktop applications have been installed
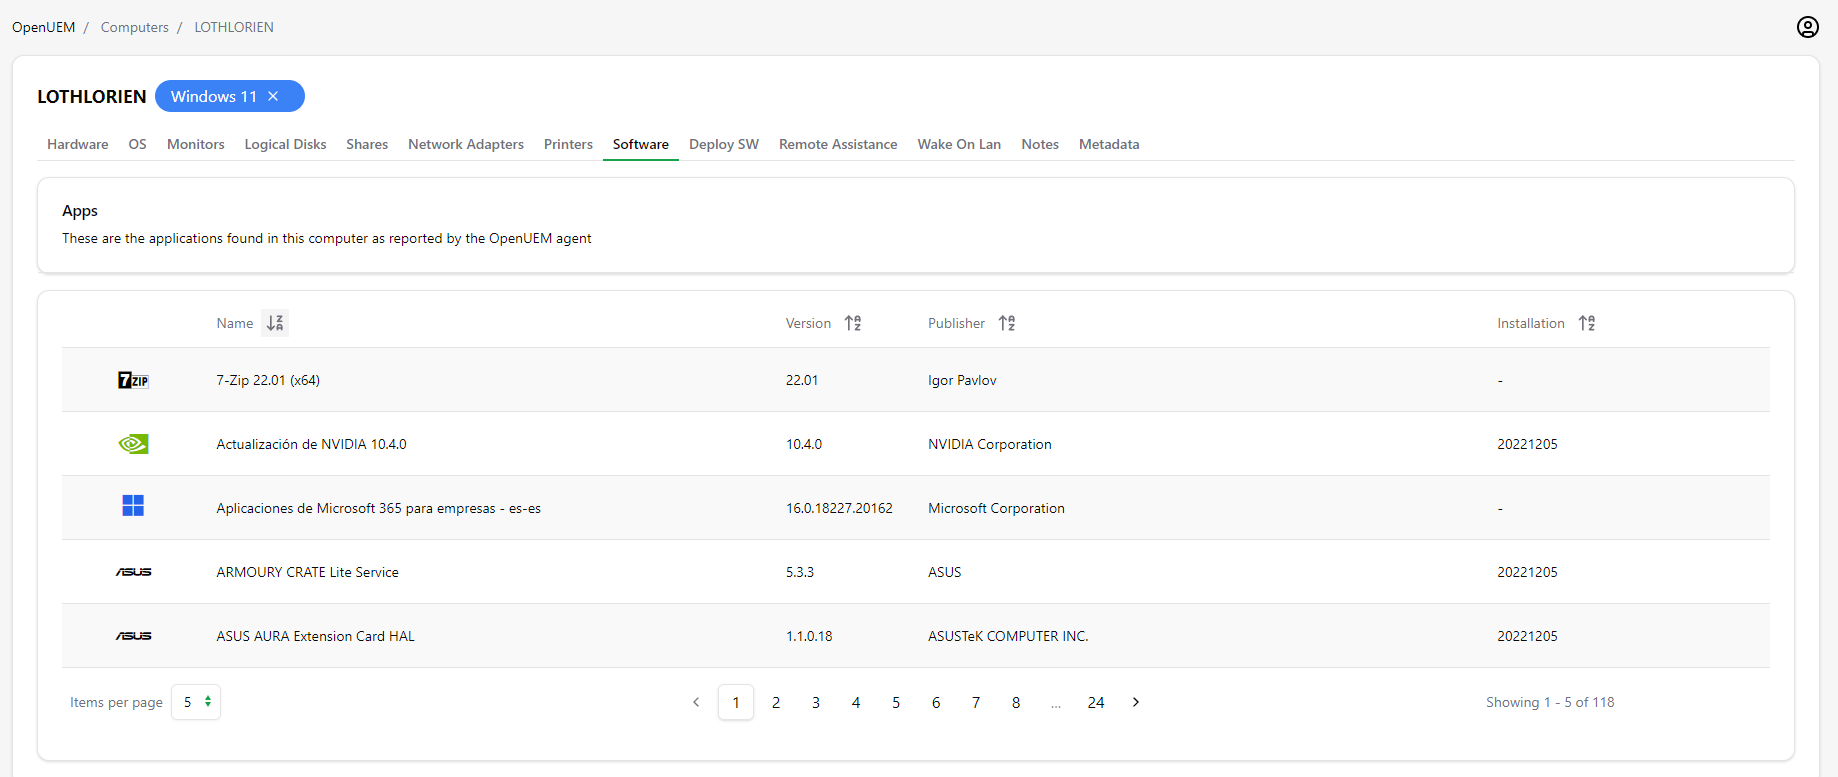
You’ll find all the applications found with their name, version, publisher, installation date (if found) and an icon (if possible) that helps you to identify the vendor.
2.11 Deploy software
OpenUEM can deploy software to your computers automatically using Winget’s client in Windows, Flatpak in Linux and HomeBrew in macOS:
- Winget is the Windows Package Manager that is available on Windows 11, modern versions of Windows 10, and Windows Server 2025 as a part of the App Installer
- Flatpak is a framework for distributing desktop applications across various Linux distributions. Flatpak is installed with OpenUEM if it's not installed directly by your Linux distribution.
- HomeBrew names itself as the missing package manager for macOS. HomeBrew must be installed manually by the admin if you want to deploy packages with OpenUEM
In Linux machines, packages installed with Flatpak may not appear in Gnome's apps menu immediately, and the user may have to log out and log in again to see the app in the list
Winget should be ready for your host if it has been used for some time, but if you have a fresh installation of Windows 10, winget.exe may not be ready to use on that endpoint although it should be installed automatically in the following days. To get the WinGet executable quicker (winget.exe), you should first update Microsoft Store after opening it and then you may have to update the app called App Installer. Visit this link to locate that app and update it
Due to a bug (2025/04/11) or issue with Microsoft's CDN the WinGet client could not get the local copy of metadata queried by WinGet. If you encounter deployment errors, you may have to run winget source update to force WinGet to update its source
You can search for an available package in Winget’s public repositories or Flatpak's Flathub repository. Depending on the agent's operating system the right repository will be searched.
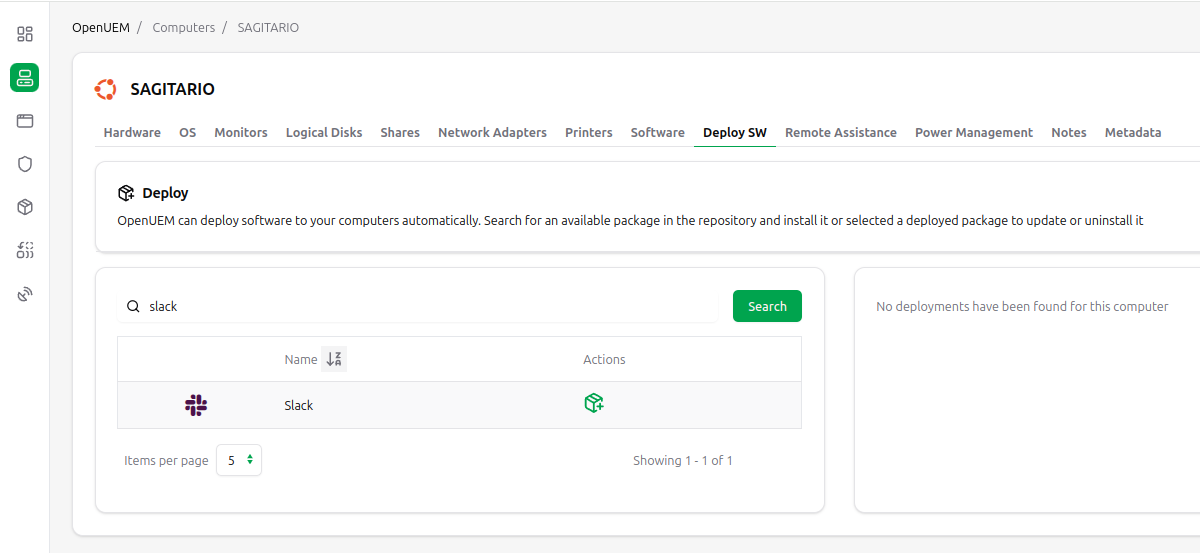
Then, click on the add package icon to request the installation.

The request will be send to the agent no matter if the computer is not running as it will receive the request as soon as its agent contact. You'll see that the package installation is in progress.
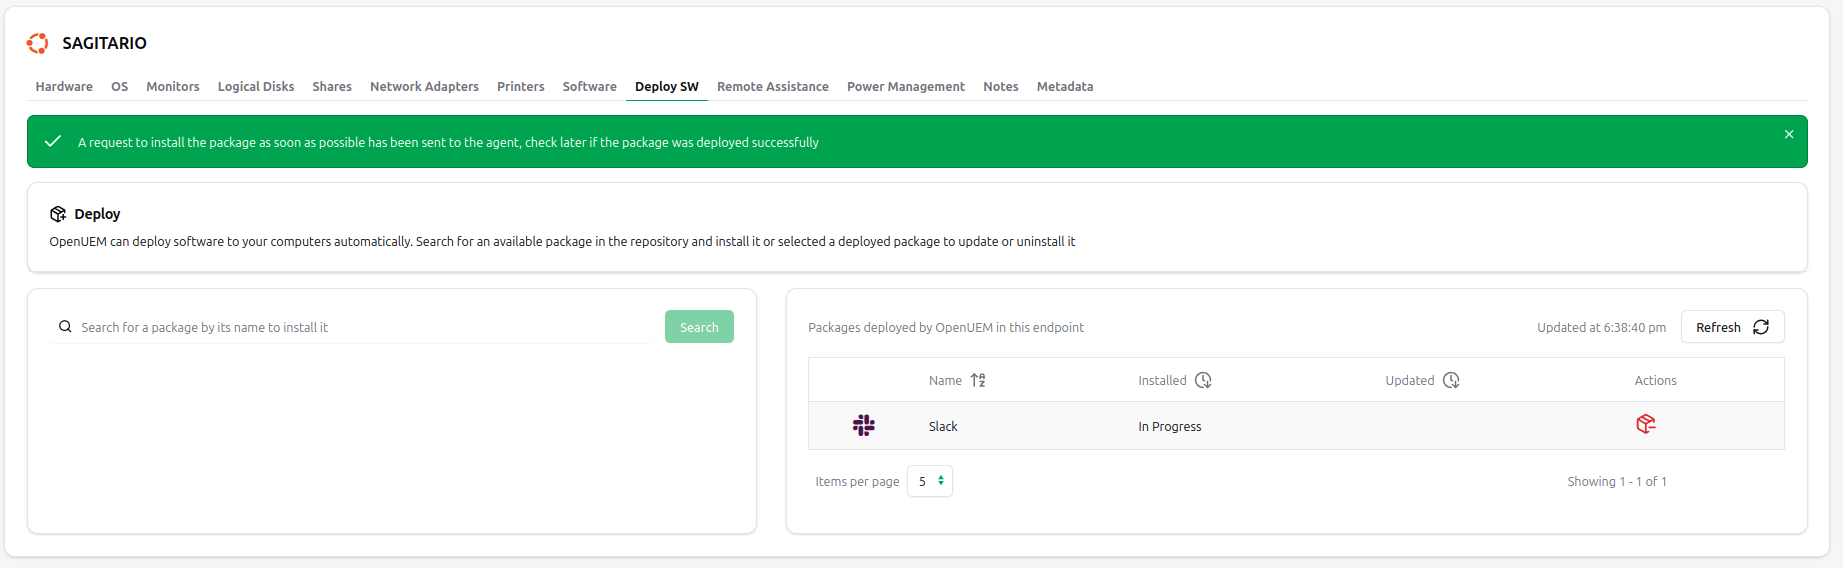
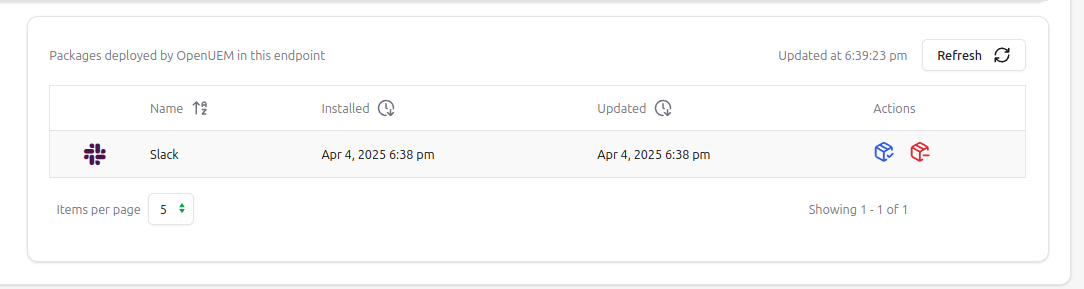
After a few minutes you’ll see that the package has been installed and that the installation date is shown.
If the package could not be installed you'll see an error message next to the package. In that case you can try to reinstall the package clicking on the green pakage icon or remove the package using the red package icon.
You can update that package later or remove it from the computer using the available icons.
2.12 Remote Assistance
OpenUEM allows you to offer remote assistance to your users using one of the following methods:
- VNC for Windows endpoints and Linux endpoints that use X11 display server and fulfill some additional requirements.
- RDP for Linux endpoints that use the Wayland display server, use the Gnome desktop and fulfill some additional requirements.
- RustDesk for Windows, Linux and macOS endpoints.
Let’s examine these methods
2.12.1 VNC
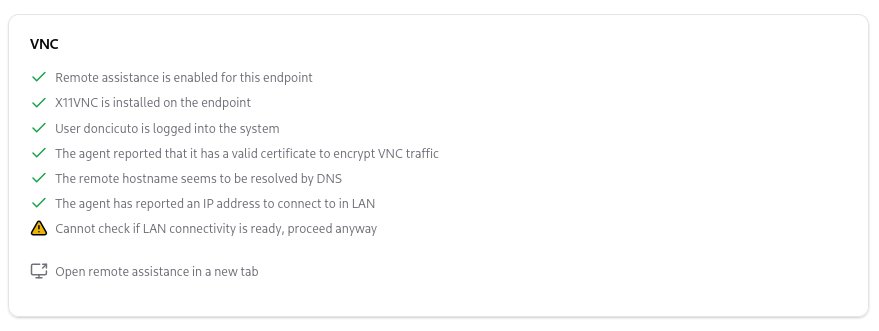
OpenUEM allows you to open a remote assistance session using VNC if these requirements are fulfilled:
- A user is logged into the remote endpoint
- Network connectivity is available (routing and firewall settings) between the computer where the console is opened in a browser, and the remote endpoint. This has been tested in a LAN and in a scenario where a VPN allows the traffic between the browser and the remote endpoint.
- The agent has reported an IP address that can be used to connect.
- The agent’s hostname, followed by the domain suffix configured globally or for the current site, can be resolved by DNS.
- The computer has a supported VNC server installed. For Windows, the supported VNC servers are TightVNC, UltraVNC and TigerVNC. For Linux using an old X11 display manager, the supported VNC server is x11vnc.
- The agent received the server.cer and server.key files when the agent was admitted or when you requested to regenerate them
OpenUEM will show which checks have passed, and a link to open the remote connection in a new browser tab may show if everything should be ready.
In the new tab, a Connect button will be displayed.
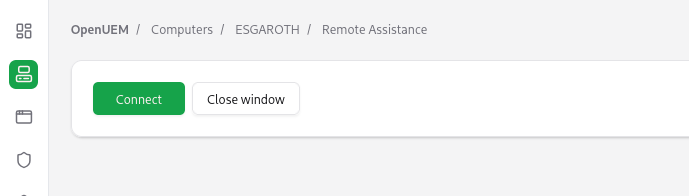
When the button is clicked, a request will be sent to the agent to perform the following tasks:
- The noVNC proxy service will be started.
- The remote VNC service will be started to run in the loopback address.
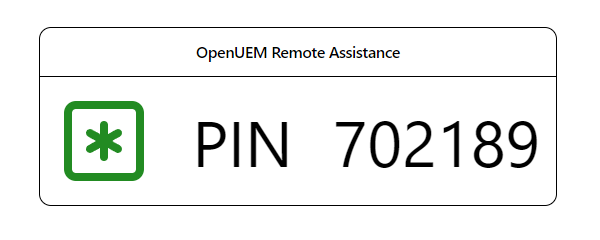
- A random PIN will be set.
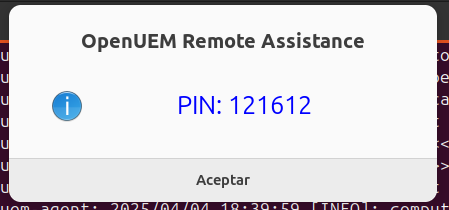
The random PIN will be displayed to the user.
By default, OpenUEM shows the PIN to the user to offer privacy to the user, as we can’t know the pin unless the user tells us. If you prefer to skip this step you can go to Admin -> General Settings -> Request VNC PIN to user and disable this behavior. In any case, the PIN which is the VNC password will be changed every time a connection is made. See the Security section for more information.

In a Windows endpoint, the PIN will be displayed in the user’s default browser.
In a Linux endpoint a notification message will be shown with a 30 seconds timeout.
The user must inform us which is the pin to open the VNC session.
While the PIN is displayed to the user, in OpenUEM a dialog to enter the PIN an authenticate the connection will be shown
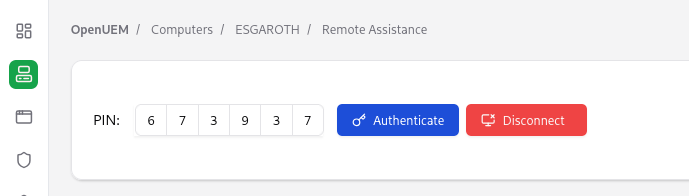
If authentication is successful, we’ll see the VNC session embedded in our browser.
If you get the Wrong authentication or server could not be reached message and you’re sure that you’re using the right PIN, you may have a connectivity issue or the hostname followed by the DNS suffix is not resolved by DNS. You can use the F12 key to open the Developer Tools in your browser. The console tab, and more specifically the network tab, will show which websocket (wss://) connection is trying to be performed and is failing.
You can click the disconnect button to close the VNC connection. The disconnection will trigger the following tasks:
- The noVNC proxy service will be stopped
- The VNC service will be stopped
- A random PIN will be set to avoid reconnections with the old PIN
The NoVNC proxy may have an issue with the services mmc snap-in (maybe you can find this issue with other snap-ins). If you click on that window you may stop seeing the mouse cursor moving through the page. In that case, it's enough to fix the issue if the services windows is minimized.
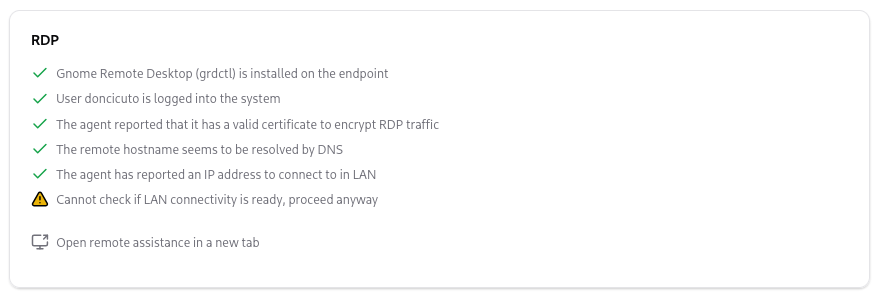
2.12.2 RDP
While the RDP protocol is generally used with Windows machines, in OpenUEM the RDP protocol is used when you try to initiate a remote assistance session with an endpoint that uses Gnome and a Wayland display manager. The reason for this is that no VNC servers seem to work with Wayland display managers, and the only way to have a remote desktop in Gnome is by using the Gnome Remote Desktop application which uses the RDP protocol.
OpenUEM allows you to open a remote assistance session using RDP if these requirements are fulfilled:
- A user is logged into the remote endpoint
- Network connectivity is available (routing and firewall settings) between the computer where the console is opened in a browser, and the remote endpoint. This has been tested in a LAN and in a scenario where a VPN allows the traffic between the browser and the remote endpoint.
- The agent has reported an IP address that can be used to connect.
- The agent’s hostname, followed by the domain suffix configured globally or for the current site, can be resolved by DNS.
- The Linux endpoint has the Gnome Remote Desktop control application (grdctl).
- The agent received the server.cer and server.key files when the agent was admitted or when you requested to regenerate them
OpenUEM will show which checks have passed, and a link to open the remote connection in a new browser tab may show if everything should be ready.
In the new tab, a Connect button will be displayed.
When the button is clicked, a request will be sent to the agent to perform the following tasks:
- The Gnome Remote Desktop service will be started.
- A random password will be set
- The RDP server will use the agent's certificates to encrypt the connection.
The random PIN will be displayed to the user.
By default, OpenUEM shows the PIN to the user to offer privacy to the user, as we can’t know the pin unless the user tells us. If you prefer to skip this step you can go to Admin -> General Settings -> Request VNC PIN to user and disable this behavior. In any case, the PIN which is the VNC password will be changed every time a connection is made. See the Security section for more information.
A notification message will be shown to the user with a 30 seconds timeout.
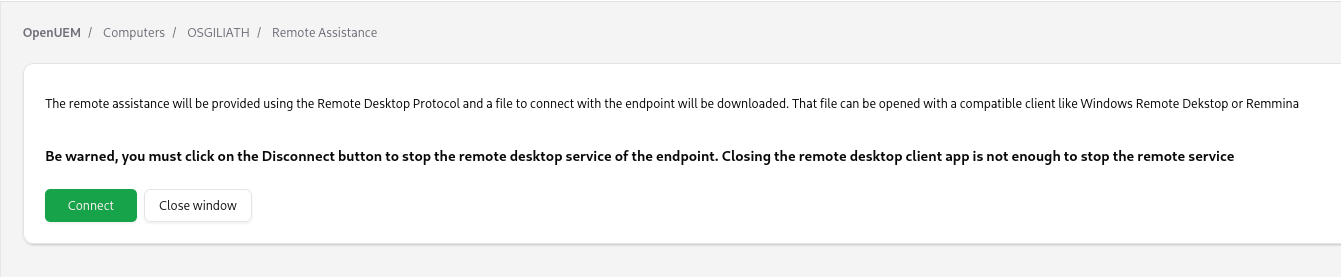
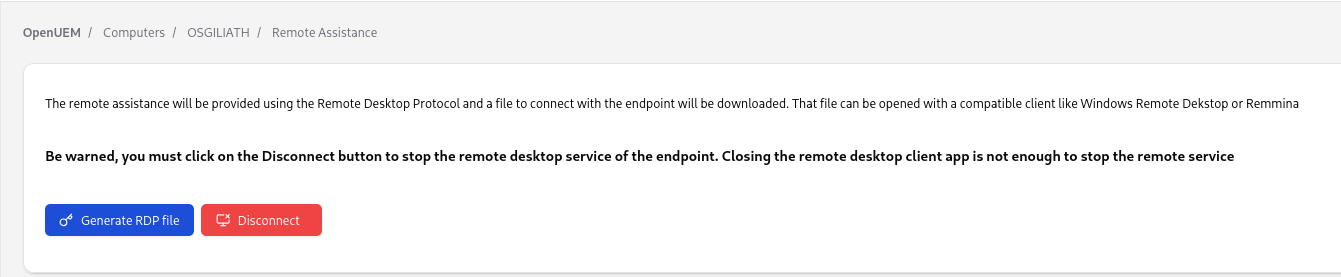
A new button to download an RDP file that includes the hostname, and the username will show. That file can be opened with Windows Remote Desktop or Remmina.
We'll use the PIN that the user provides us with our Remote Desktop viewer
If authentication works and no connectivity issues arise, we'll see the remote desktop
Once you decide to close the RDP session, you’ll close your RDP client’s window but note that to perform an ordered close (the RDP service is stopped, the credentials are cleared, the service is disabled...) you’ll have to click on the Disconnect button.
2.12.3 RustDesk
RustDesk is an open-source remote desktop solution with self-hosted server options that is a perfect replacement for TeamViewer.
OpenUEM as of version 0.10.0 has a basic integration that can configure remote RustDesk settings based on configurations you add to OpenUEM. These are the settings supported by OpenUEM:
- You can add the hostname or IP address of your self-hosted Relay Server.
- You can add the hostname or IP address of your self-hosted ID Server.
- If you use a self-hosted RustDesk server you must specify the content of the public key (usually at /var/lib/rustdesk-server/id_ed25519.pub)
- You can use a permanent password. In this case, the permanent password will be a random password that will change with each connection. If you don’t set a permanent password your remote user will need to open the RustDesk application and provide you the RustDesk random password.
- You can choose to use a direct connection by using the IP address of the remote endpoint. This is a good choice if you work in a LAN, as the connection is peer-to-peer, and you don’t require a server.
- You can specify the IP address that can connect to your remote endpoint using a whitelist.
You can use RustDesk with Windows, Linux and MacOS endpoints, and you can choose to deploy RustDesk from OpenUEM if it's quicker and easier for you.
If you deploy RustDesk using Flatpak from OpenUEM to an endpoint that uses Wayland note that you’ll have to ask your remote user to open the RustDesk application after you initiate the RustDesk connection and before you can open the connection in your RustDesk app.
You can have global RustDesk settings that will be used for all your tenants/organizations in OpenUEM or you can have specific RustDesk settings for an organization.
If you don’t want to specify any RustDesk settings and you want to use RustDesk’s public servers, you can as these settings are optional. Your remote user will need to open the RustDesk application to give you the password to connect.
The settings are available at the RustDesk tab:

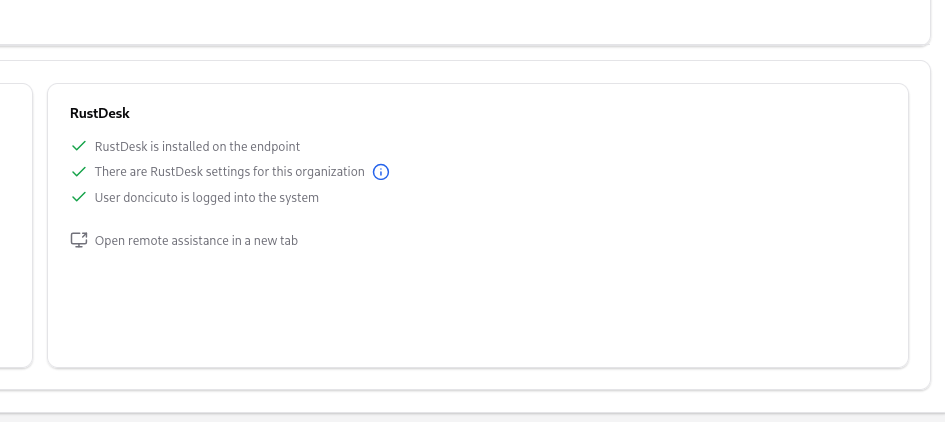
If you want to use RustDesk’s integration with OpenUEM, you must visit the Remote Assistance tab in the computer’s view. You’ll see a RustDesk’s section. OpenUEM checks if the RustDesk is installed on the remote endpoint and if a user is logged into the system. Note that RustDesk settings are optional, so they are not required. If all the checks pass, you’ll see a button that will allow you to open a new browser tab.
In the new window, you’ll find a button to Initiate a RustDesk session. That button, when clicked, will connect to the remote endpoint and make the configuration changes to reflect the OpenUEM settings.

If a previous setting for RustDesk exists (a non OpenUEM configuration), the agent will create a backup of those settings to avoid conflicts.
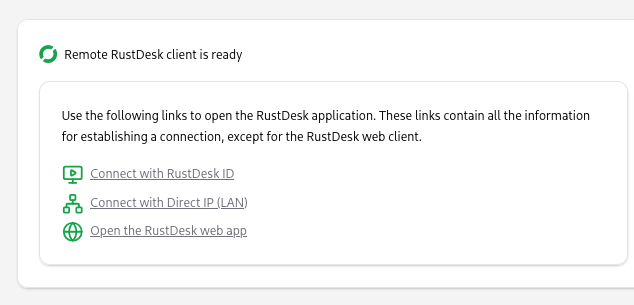
If the connection can be established, new data will be shown in the current tab.

The first card provides you with links (rustdesk:// URIs) to open the RustDesk that is installed on your computer with the parameters to connect (ID, IP Address, permanent password...) or a link to open RustDesk web client (in this case no parameters can be passed).
In Gnome Linux you can associate the rustdesk:// URIs adding the following lines to the $HOME/.config/mimeapps.list file
[Added Associations]
x-scheme-handler/rustdesk=com.rustdesk.RustDesk.desktop
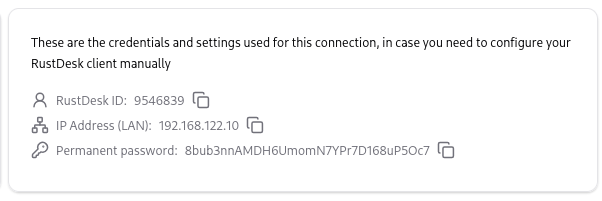
The second card contains credentials and additional information that you can use to configure your RustDesk local or web app to establish the connection with the remote RustDesk endpoint.
The third card contains a button to close the remote RustDesk app and revert to the previous configuration that RustDesk may have had.
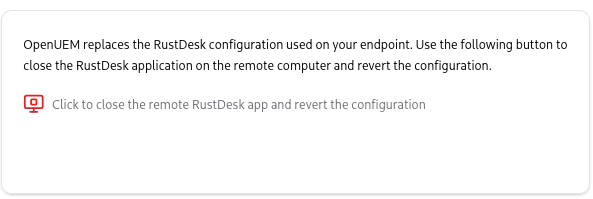
If you forget to use this button, the backup files will remain untouched until you use that button after you initialize a new connection.
When we are finished we can click on the Disconnect button and click the on the Close window button.
If the VNC screen is too big, try to zoom on your browser or press F11 to get your browser in full screen.
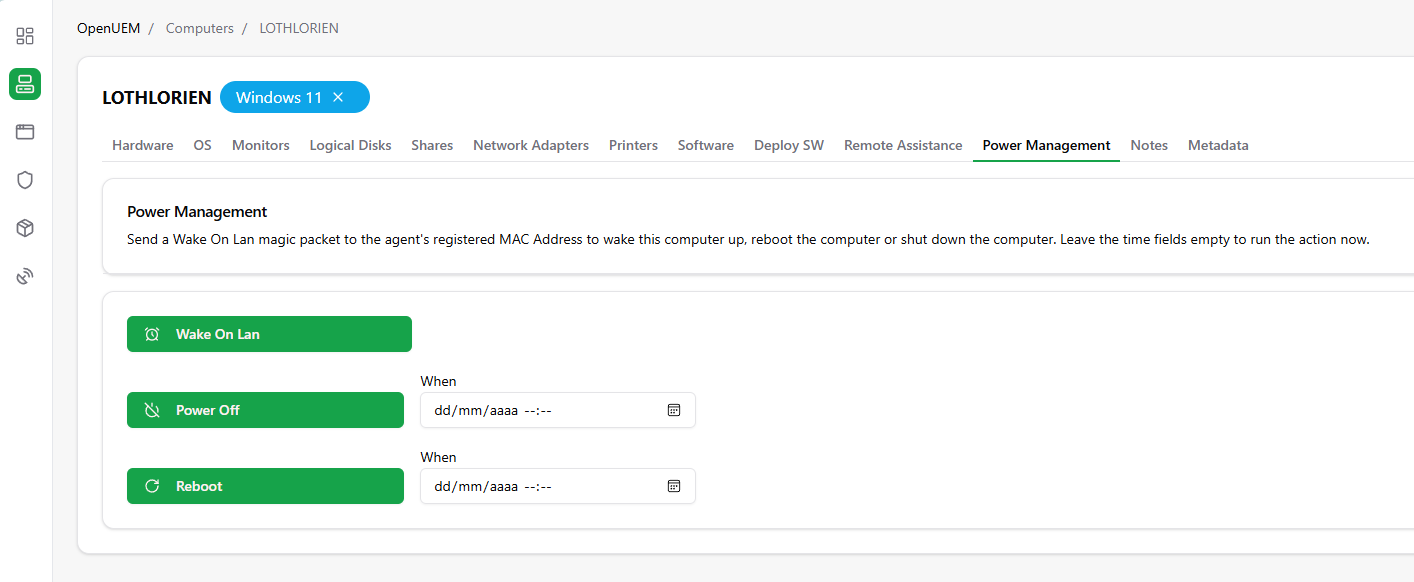
2.13 Power Management
You can schedule a computer's power off or reboot action. Also, you can send a Wake On LAN magic packet that will boot the computer up, if the computer is in the same LAN as the console server, and if the computer has been configured to boot with WOL (UEFI setting and/or updated network drivers).
2.14 Notes
You can take notes about your endpoint using a simple markdown editor. Insert the note, use the buttons to add headings, set bolder text… and save it.
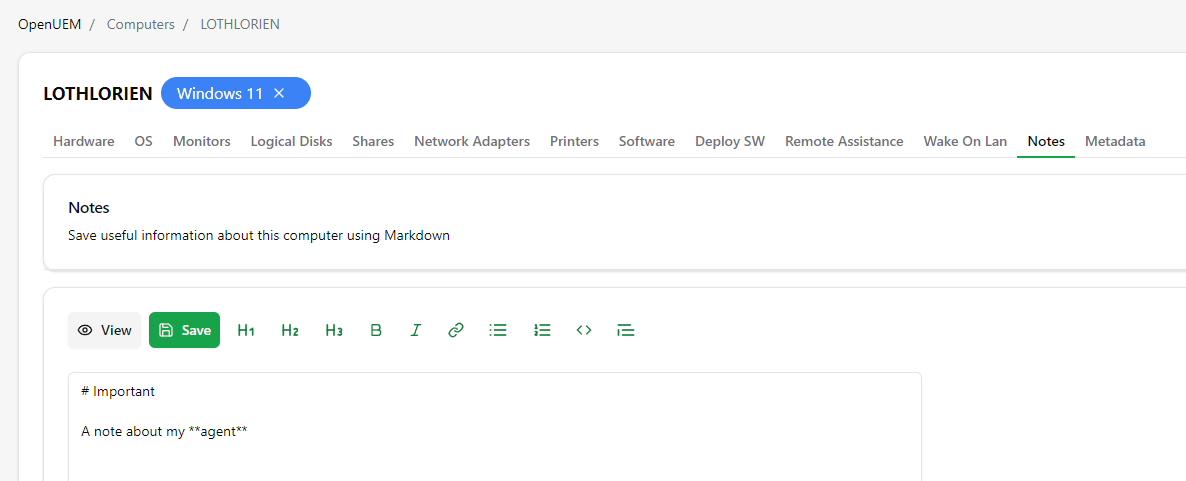
When you visit the note again, you’ll see the preview so if you want to change its contents click on the Edit button.

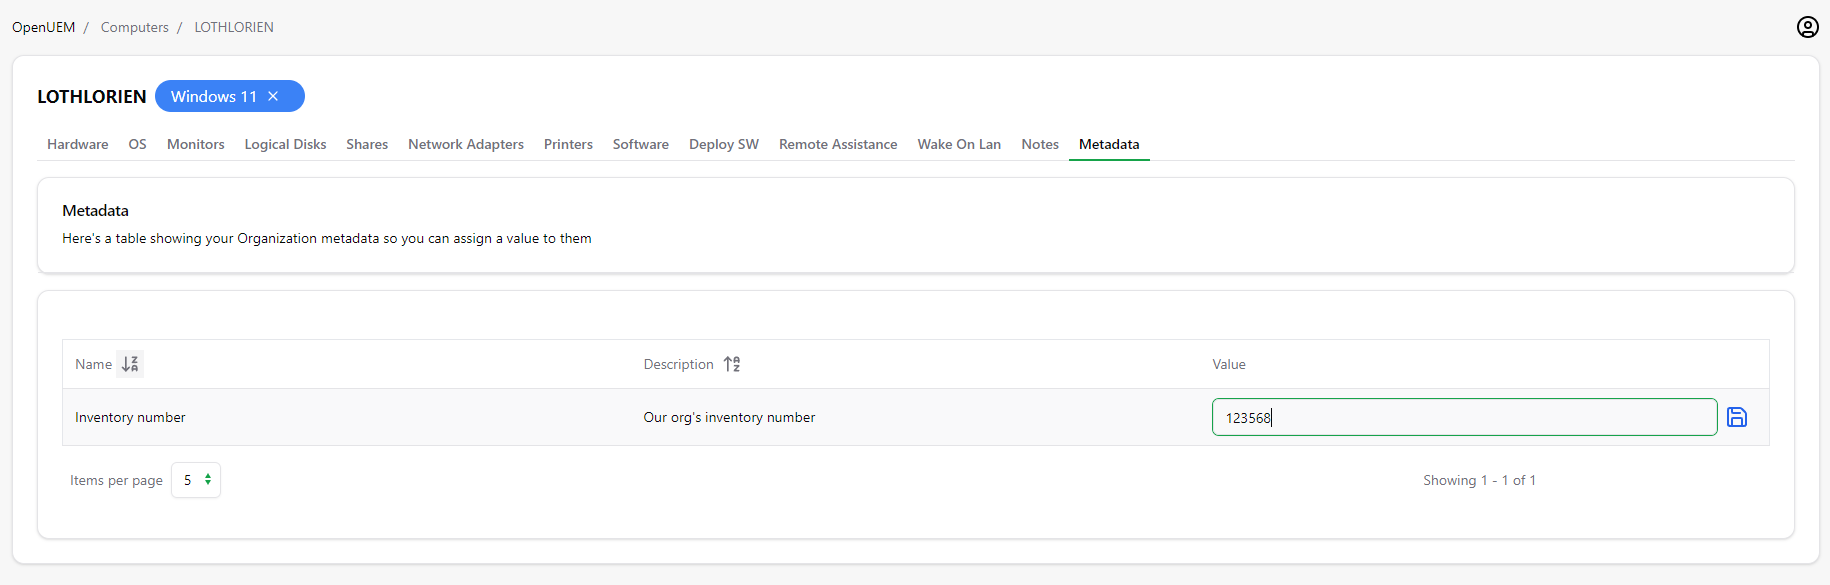
2.15 Metadata
You can save custom information associated with an endpoint using metadata.
You must create metadata first in Admin -> Metadata adding a name for metadata and an optional description.
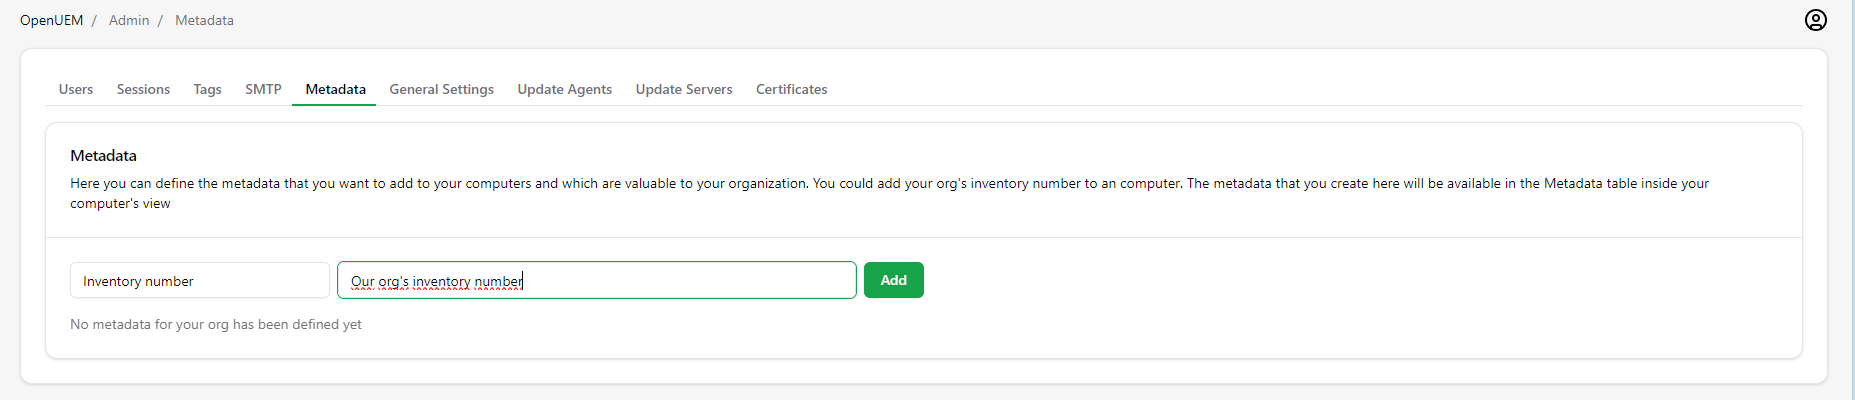
Once you create metadata, you’ll see it is available for every endpoint.
2.16 NetBird
NetBird is an open-source, zero-trust networking platform that creates secure, peer-to-peer mesh networks using WireGuard technology to connect devices directly and securely, eliminating complex VPN gateways, firewall rules, and central servers for remote access to internal resources, home labs, or cloud infrastructure.
OpenUEM can install, setup, and perform a basic configuration for NetBird agents. You will be able to manage your NetBird agents on demand, so you can benefit from this private network solution.
To enable the NetBird integration, you must visit the settings section of your organization. There you’ll find a NetBird tab.
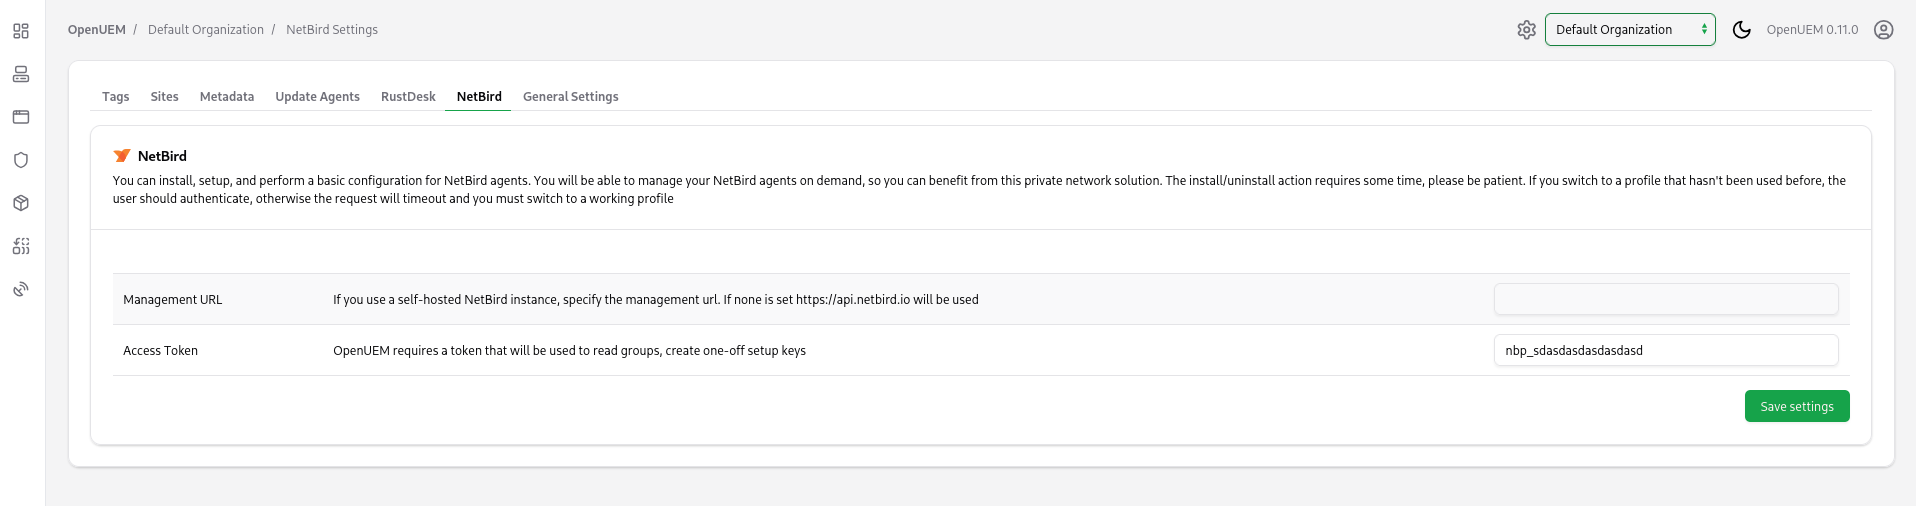
In this tab you must provide the following information:
- Management URL. If you use a self-hosted NetBird instance, specify the management url
- Access Token. OpenUEM requires a token that will be used to read groups, create one-off setup keys
NetBird documentation explains how you can create a service user and an associated token
Once you add the NetBird API token, you’ll see a new NetBird tab when you visit the details of a computer.
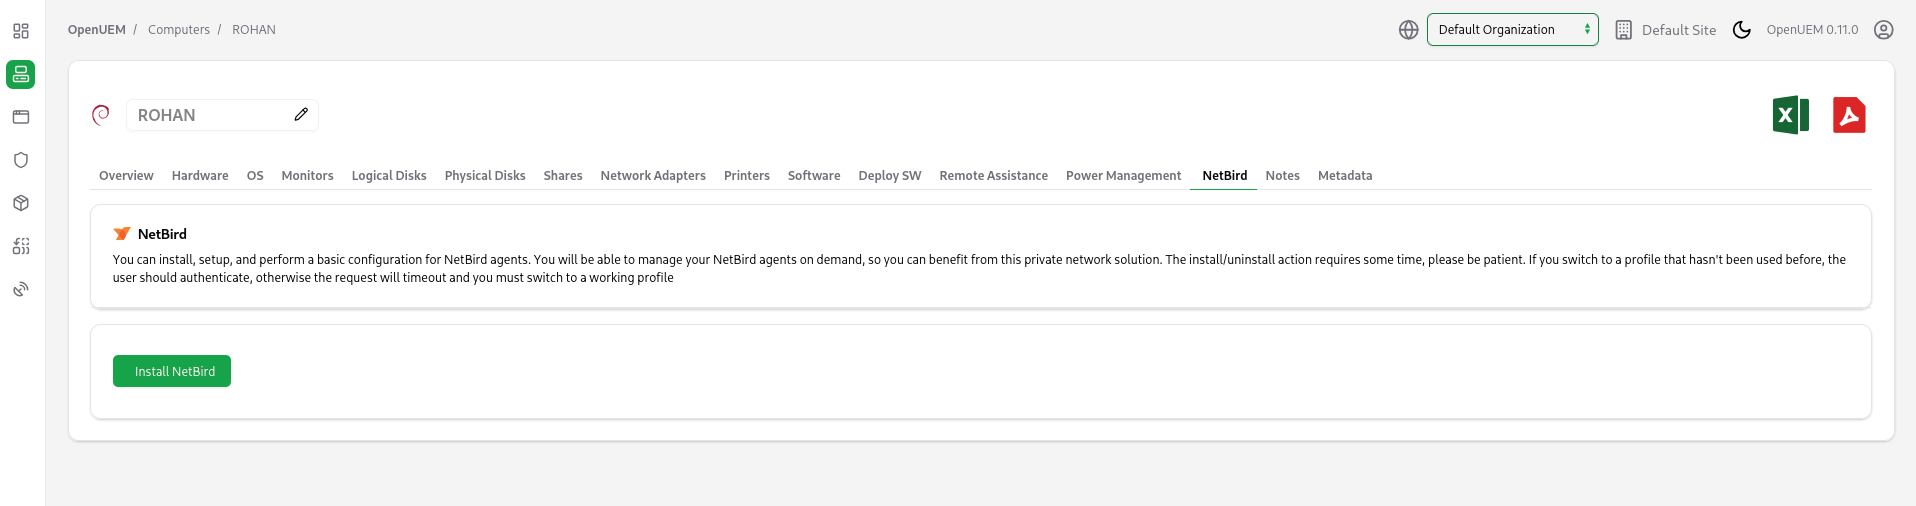
If the OpenUEM agent detects that a NetBird client is installed, you’ll see the information gathered by OpenUEM. If no NetBird client is found, you can install it from the OpenUEM console. Note that the installation is synchronous and takes time, so please wait until the installer script downloads the files.
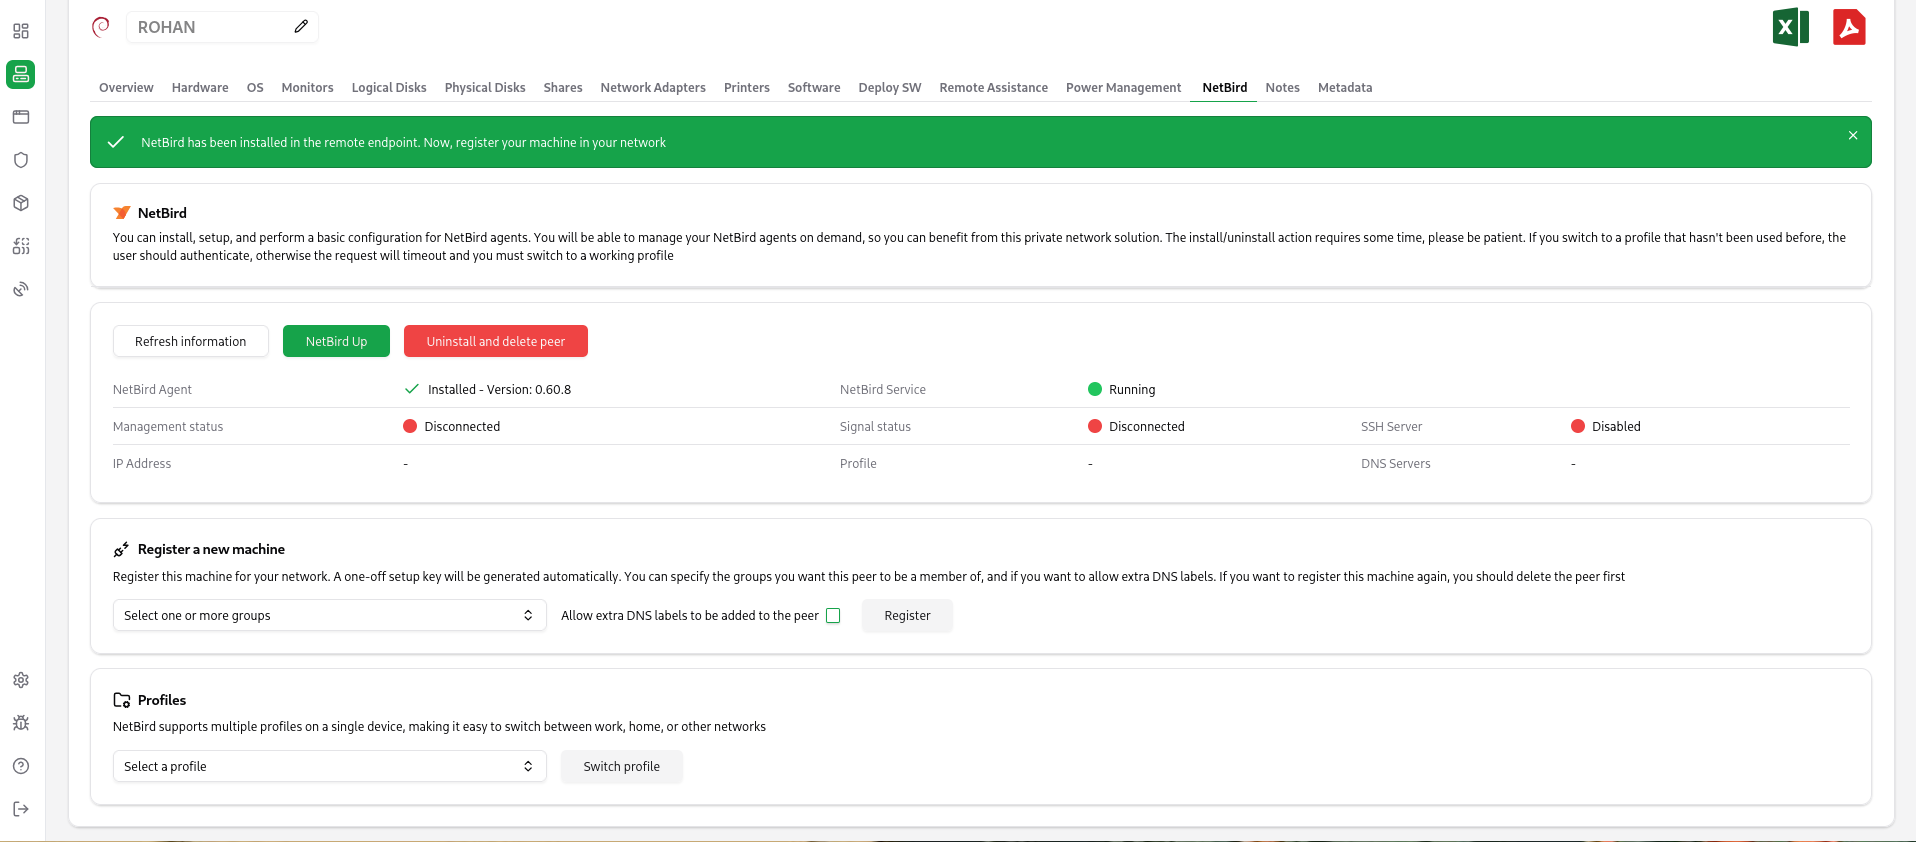
If you’ve just installed the NetBird client, you should register the client on your NetBird network. You can specify the group that you want this client to be a member of. The registry action is synchronous, so you should wait for a few moments.

If the NetBird client is successfully registered, you should see information gathered from the OpenUEM agent showing that the NetBird client is connected to your network.

There are more NetBird actions that you can execute from the console:
- NetBird Up. This command should establish a connection. If the NetBird client is not registered, a browser window may open to the user, so she can authenticate.
- Netbird Down. This command should tear down the NetBird connection.
- Delete a peer. You can delete the peer from NetBird if an IP address is shown as that address will be used to identify the NetBird peer using the API.
- Uninstall NetBird. The OpenUEM agent will try to uninstall the agent either using winget or by using an uninstall script. It’ll also try to delete the peer, so it’s recommended to run the uninstall command if an IP address is shown in the information section.
- Switch to a profile. NetBird can use local profiles that should be created by the user on the remote endpoint (OpenUEM cannot create these profiles). You can switch to one of those profiles from OpenUEM console but note that if the user hadn’t used that profile before, a browser window may open to the user, so she can authenticate.
If you need to install and/or register NetBird clients in many endpoints, you can create OpenUEM tasks in a profile that can perform those actions:
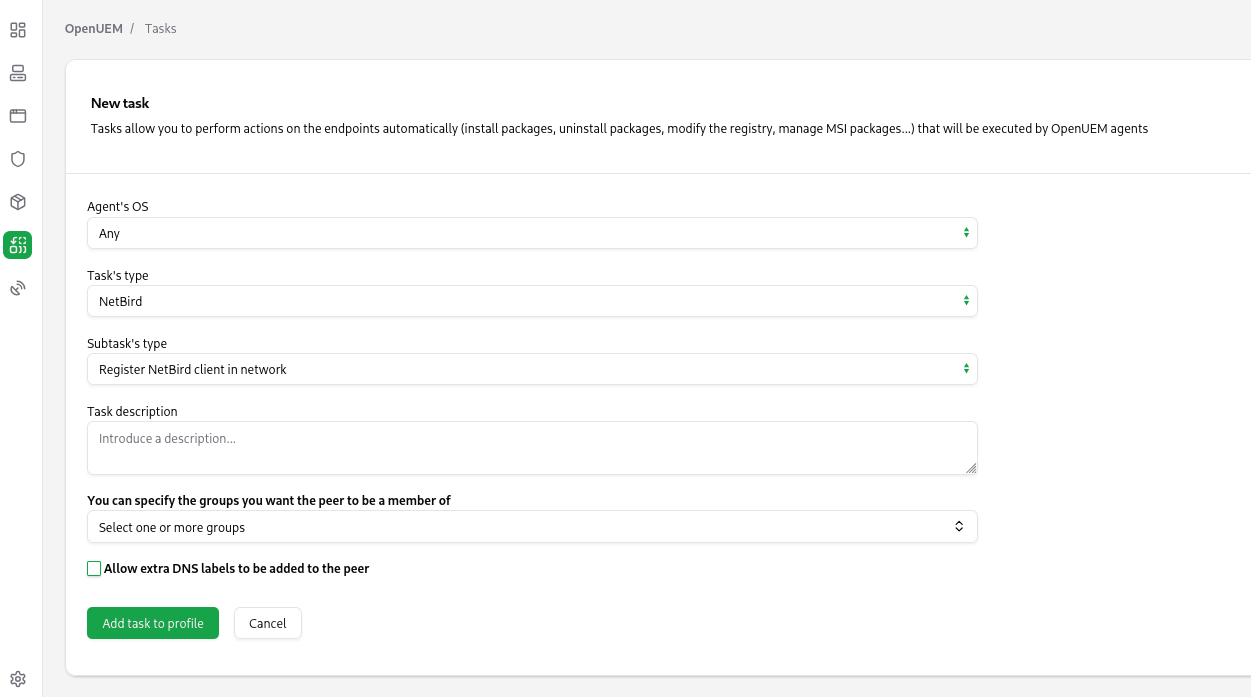
2.17 Tasks
In OpenUEM 0.12.0, if your endpoint is running at least version 0.11.0, you should see a new tab called "Tasks."
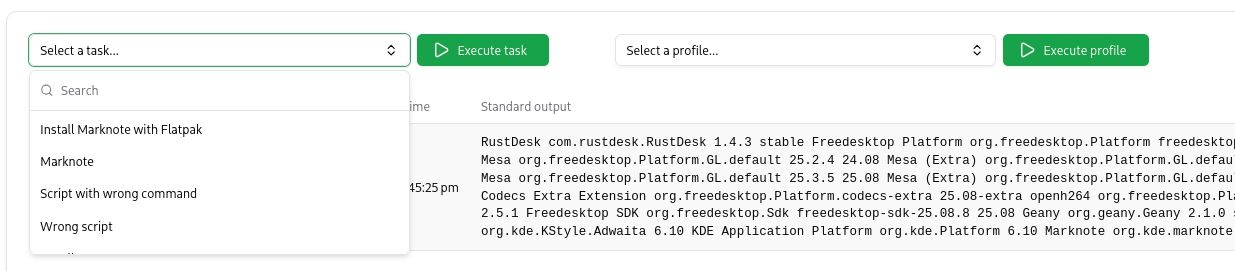
On this tab, you'll see reports of the tasks executed on that endpoint. You should see whether the task executed successfully, as well as the standard error and standard output, if reported. You can rerun a task immediately if the agent is online by clicking the play button.
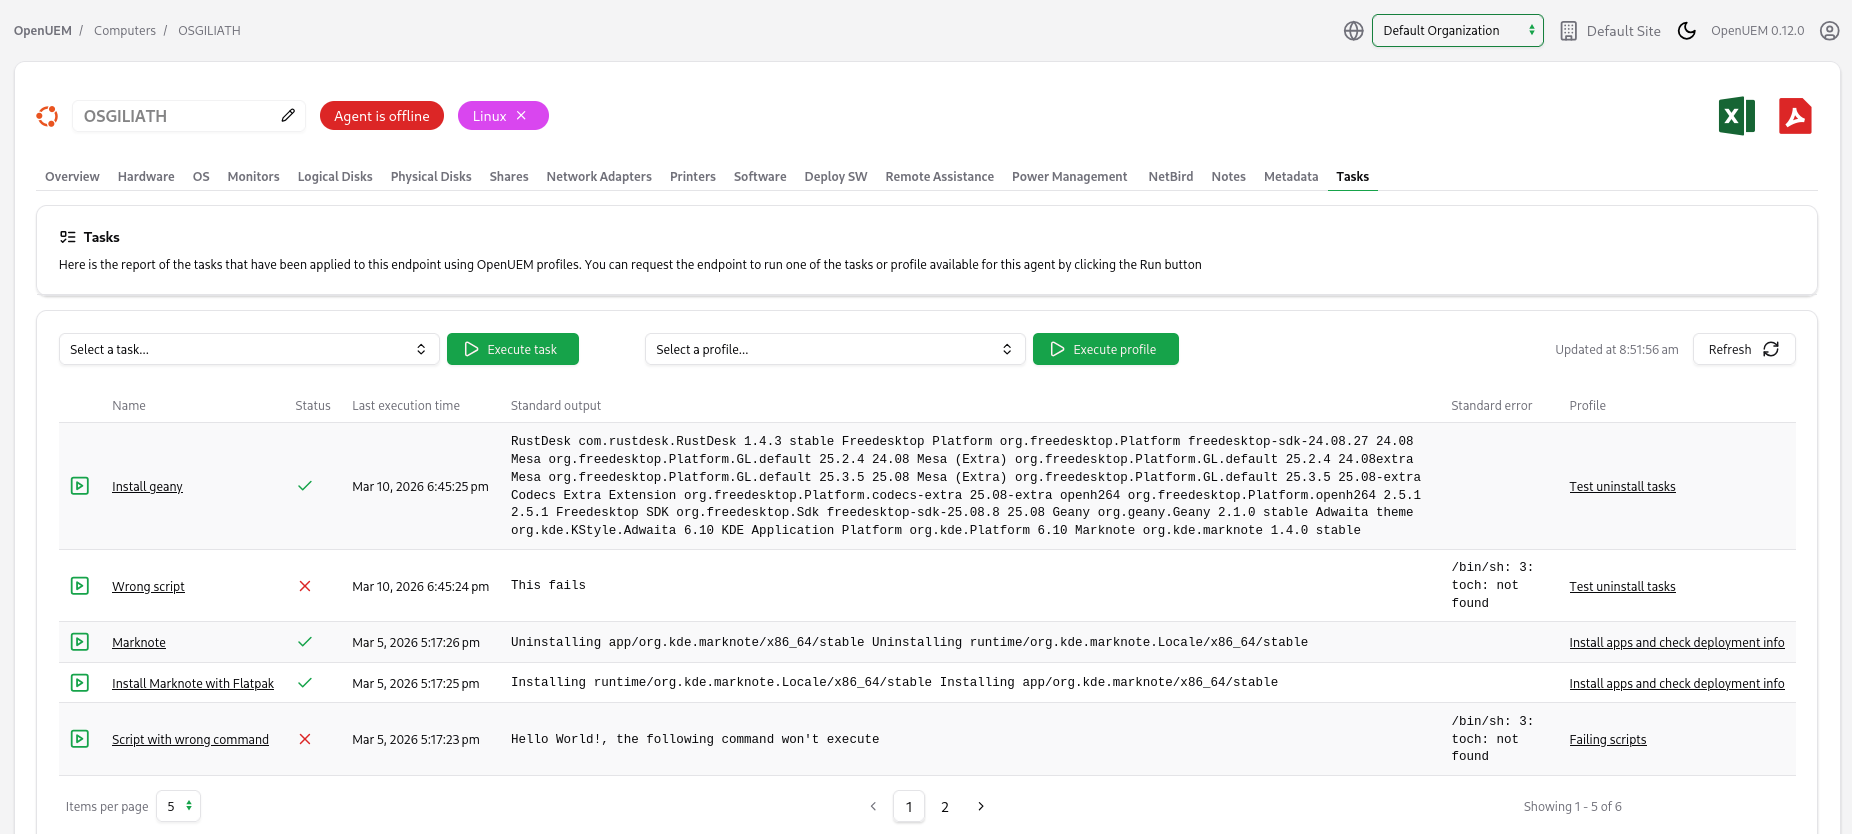
If desired, you can run a task or profile that can be applied to that endpoint by selecting it from the dropdown menus. This way, you don't have to wait the default 30 minutes for the agent to check if the profiles should be applied.
3. PDF/CSV Report
You can generate a PDF/CSV report that lists your computers and preserves your filters and sorting using the PDF/CSV buttons in the section header.

Here’s a sample of the generated report.
