🐳 Docker / Podman
OpenUEM can be run using Docker/Podman containers that are hosted on Docker Hub
You can use docker compose or podman compose to install and run all OpenUEM components on a single machine following these steps:
For deployments carried out before December 22, 2025, breaking changes are introduced. Please go to the Legacy section in this document to know how you can migrate from the older docker compose file.
1. Get the compose file
Clone the openuem-docker repository:
git clone https://github.com/open-uem/openuem-docker
2. Create .env file with environment variables
Use the file named .env-example file to create a .env file
The file must be named .env without extension and with a dot before the env word as required by Docker to read the
environment variables
In the .env file, edit the environment variables that docker compose will use to build and get the containers up and
running. The .env-example you just copied already sets up a working demo instance of OpenUEM on the openuem.example
domain. If you want to simply try out OpenUEM you can just use it as-is. If you want to setup a production system or use
your own domain and information, you can customize the .env you just created.
It's strongly recommended to change the JWT key with a random 32 characters long string
Here are the possible environment variables that can appear in the .env file.
The variables prefixed with DATABASE are used to create a Postgres connection URI string. Note that the connection URI needs to be encoded with percent-encoding if it includes symbols with special meaning in any of its parts as mentioned in Postgres docs. If you use special characters in your username or password, you may find the following page of interest to encode the value set to the variable. For example if your password is te=st you should use the following value te%3Dst to replace the = sign.
| Name | Description | Required | Example value |
|---|---|---|---|
| DATABASE_DB_NAME | Name of the postgres database used (will be created automatically on first start) | yes | openuem |
| DATABASE_PORT | Public port exposed by the database service | yes | 5432 |
| DATABASE_USER | Username used to connect to the database (will be created automatically on first start) | yes | openuem |
| DATABASE_PASSWORD | Password used to connect to the database (will be set automatically on first start) | yes | supersecret-dbpassword |
| OPENUEM_DATABASE_URL | The database url in format postgres://user:password@openuem-db-1:port/openuem | yes | postgres://openuem:supersecret-dbpassword@openuem-db:5432/openuem |
| OPENUEM_ORGNAME | Your organization's name | yes | OpenUEM |
| OPENUEM_ORGPROVINCE | Your organization's province | no | Valladolid |
| OPENUEM_ORGLOCALITY | Your organization's locality | no | Valladolid |
| OPENUEM_ORGADDRESS | Your organization's address | no | My org's address |
| OPENUEM_COUNTRY | Your organization's country | yes | ES |
| OPENUEM_DOMAIN | Your DNS domain. All other services should resolve to either this domain or a subdomain. | yes | openuem.example |
| TZ | The timezone used by OpenUEM containers | no | Europe/Madrid |
| REVERSE_PROXY_HOST | If you want to use a reverse proxy, set the domain name that you want to use to visit the console, use an empty value otherwise | yes | console.openuem.example or use an empty value otherwise |
| REVERSE_PROXY_CONSOLE_PORT | If you want to use a reverse proxy, set the port that will be used to serve the console web ui, use an empty value otherwise | yes | 443 or use an empty value otherwise |
| REVERSE_PROXY_AUTH_PORT | If you want to use a reverse proxy, set the port that will be used to answer for auth, use an empty value otherwise | yes | 4443 or use an empty value otherwise |
| NATS_HOST | The domain name used by the NATS server | yes | nats.openuem.example |
| NATS_PORT | The port used by the NATS server | yes | 4433 |
| NATS_DEBUG | If you want to enable debug for the NATS server | no | true or false |
| NATS_WEBSOCKET_PORT | If you want to enable websocket support for the NATS server | no | 8888 |
| OCSP_URL | The URL for the OCSP responder service | yes | http://ocsp.openuem.example:8000 |
| OCSP_HOST | The host domain for the OCSP responder service | yes | ocsp.openuem.example |
| OCSP_PORT | The port used by the OCSP responder | yes | 8000 |
| CONSOLE_HOST | The name of the server where the console is hosted | yes | console.openuem.example |
| CONSOLE_PORT | The port used by the console | yes | 1323 |
| CONSOLE_AUTH_PORT | The port used by the auth server | yes | 1324 |
| CONSOLE_JWT_KEY | The key used to encrypt JWT tokens for user registration | yes | averylongsecret |
| OPENUEM_NATS_SERVERS | List of all NATS servers that will be used by many OpenUEM components. Normally this will be $NATS_HOST:$NATS_PORT | yes | nats.openuem.example:4433 |
| RE_ENABLE_CERTIFICATES_AUTH | If you want to re-enable the use of certificates to log in | no | true or false |
| RE_ENABLE_PASSWD_AUTH | If you want to re-enable the use of username and passwords to log in | no | true or false |
| RESET_OPENUEM_USER | If you want to reset the openuem user to get a new password | no | true or false |
It is possible to only use one domain for all services, but CONSOLE_HOST, OPENUEM_NATS_SERVERS and NATS_HOST
should be resolved by your DNS service. If you are just locally deploying a demo instance and don't have access to a
DNS, you can override your devices hosts configuration and allow local domain resolution.
- On Linux: this configuration can be found under
/etc/hosts. Add the line{YOUR_LOCAL_IP} {NATS_HOST} {OCSP_HOST} {CONSOLE_HOST} - On Windows: the configuration can be found under
C:\Windows\System32\drivers\etc\hosts. Add the line{YOUR_LOCAL_IP} {NATS_HOST} {OCSP_HOST} {CONSOLE_HOST} - On macOS: the configuration can be found under /private/etc/hosts
You have to replace {YOUR_LOCAL_IP} and {OPENUEM_DOMAIN} with their respective values set in the .env file. It is important that you
use your local ip address (e.g. 192.168.1.43) instead of localhost or 127.0.0.1. Docker will copy these
overrides into the containers on start. If you use localhost, each container will only try to connect to itself, making
proper domain resolution impossible.
The method of editing the hosts file should only be used for a local demo instance
3. Use a reverse proxy (Optional)
You can run OpenUEM behind a reverse proxy. Caddy can be used and is supported for this deployment with docker compose.
If you decide to use Caddy as a reverse proxy, set the variables prefixed REVERSE_PROXY in the .env file (see the
table above). Remember that the hosts / domains you set have to be resolvable by a DNS.
4. Launch docker compose command to create the database and generate the certificates
Where the compose.yaml file and the .env files are located, execute the following command:
docker compose up openuem-certs -d
This command will create the database service and generate all the certificates required by OpenUEM in the certificates folder:
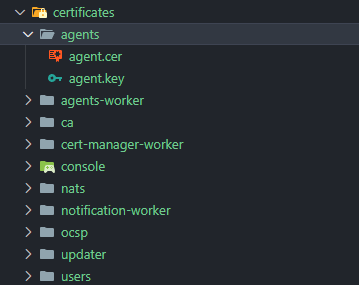
The generation of certificates can take some time, don't stop the containers or go to the next step until you check that certificates have been indeed created. If you find two files under the agents folder and one .pfx file inside the users folder, you're good to go.
5. Launch docker compose again, to create the remaining services
Once you've checked that the certificates have been generated, run the following commands to launch the remaining services:
Without Caddy support:
# Docker Compose:
docker compose up -d
With Caddy support:
# Docker Compose:
docker compose -f compose-caddy.yml up -d
If you find any error trying to launch the services, run the docker compose down or podman compose down commands shown below, remove the
volumes and the certificates folder and start again
If you don't use Caddy:
docker compose down
sudo rm -rf certificates
docker volume rm openuem_jetstream openuem_pgdata
And if you use the Caddy option:
docker compose -f compose-caddy.yml down
sudo rm -rf certificates
docker volume rm openuem_jetstream openuem_pgdata openuem_caddy_config openuem_caddy_data
You can use docker compose logs -f to view the output from OpenUEM containers.
Open an issue with all the possible information if you can't start OpenUEM with Docker :::
5. Stopping OpenUEM
If we want to stop OpenUEM we should run the following commands:
Without Caddy support:
docker compose down
With Caddy support:
docker compose -f compose-caddy.yml down
6. Trust in digital certificates created
Before we can visit OpenUEM's console, we must import two digital certificates to our browser, the Certificate Authority
certificate (ca.cer) and the user's certificate to log in. You have a guide explaining how to import
certificates here
Next to the compose.yaml file you’ll find a certificates folder containing all the certificates that OpenUEM has
created and that are required to run.
7. Visit OpenUEM's Console
Now open https://CONSOLE_HOST:CONSOLE_PORT (replace the values that you've set in your .env file) and you should see
OpenUEM's console
If you've set a reverse proxy the url should be https://REVERSE_PROXY_HOST:REVERSE_PROXY_CONSOLE_PORT

Finally, log in to the console
8. Update
To update the Docker containers, use --force-recreate as the openuem-cert-manager image may need to replace the nats.conf file to include new authorizations for the NATS server
9. Legacy docker compose
Notes for deployments carried out before December 22, 2025
The previous version of this repository contained environment variables that have been replaced or renamed. Additionally, a build folder containing scripts for generating the database and NATS configuration has been removed. If you wish to update your Docker deployment, please use the following information.
Do not delete the volume used by the Postgres container to ensure the database remains intact when updating containers. Do not use the -v option with Docker Compose to prevent the deletion of the Postgres volume.
- Remove the old containers. Run the following commands from the folder where your old deployment was created.
docker compose --profile openuem down
docker compose --profile init down
- Clone the new repository
git clone https://github.com/open-uem/openuem-docker
-
Rename the new openuem-docker repository folder to openuem. This is needed to ease the reuse of the previous Docker volumes that contain the database and the NATS streams.
-
Use the file named
.env-examplefile to create a.envfile. Set the new variable values using the following table to help you migrate your old .env definitions:
| Old variable name | New variable name |
|---|---|
| POSTGRES_PORT | DATABASE_PORT |
| DATABASE_URL | DATABASE_USER |
| DATABASE_URL | DATABASE_PASSWORD |
| DATABASE_URL | DATABASE_DB_NAME |
| ORGNAME | OPENUEM_ORGNAME |
| ORGPROVINCE | OPENUEM_ORGPROVINCE |
| ORGLOCALITY | OPENUEM_ORGLOCALITY |
| ORGADDRESS | OPENUEM_ORGADDRESS |
| COUNTRY | OPENUEM_ORGCOUNTRY |
| DOMAIN | OPENUEM_DOMAIN |
| AUTH_PORT | CONSOLE_AUTH_PORT |
| JWT_KEY | CONSOLE_JWT_KEY |
| SERVER_NAME | CONSOLE_HOST |
| SERVER_NAME | OCSP_HOST |
| SERVER_NAME | NATS_HOST |
| NATS_SERVERS | OPENUEM_NATS_SERVER |
The old NATS_SERVERS variable has been replaced with two variables NATS_HOST and NATS_PORT.
The old OCSP variable has been replaced with two variables OCSP_HOST and OCSP_PORT.
The old SERVER_NAME was used to assign the console hostname, the ocsp responder URL, and the NATS_SERVERS variable. You must specify the CONSOLE_HOST, OCSP_HOST, NATS_HOST accordingly.
-
Create a certificates folder and copy the contents of the old certificates folder where your old deployment was created.
-
Run
docker compose up -dfrom the new folder. The new images will be pulled and the new services will be started.
10. Troubleshooting and FAQ
10.1. Why I get 401 | Please provide valid credentials when I try to log into OpenUEM console?
OpenUEM requires a user's certificate to log in. That certificate must be imported in the user's browser before trying to log-in. You can import the certificates following these steps
10.2. Why I see messages like read certificates/console.cer: is a directory in docker logs?
That means that certificates were not generated in the initial phase, most probably there's a connection issue with the
database container or wrong credentials have been used. Database credentials must match between the DATABASE_URL
variable set in the .env file and the file build/postgres/init.sh file.